Essential cookies enable basic functions and are necessary for the proper function of the website.
Cookie Preferences
This cookie is used to store the user's cookie consent preferences.
30 days
Cookie Preferences
This cookie is used to store the user's cookie consent preferences.
-
Cookie Preferences
This cookie is used to store the user's cookie consent preferences.
-
Cookie Preferences
This cookie is used to store the user's cookie consent preferences.
-
Cookie Preferences
This cookie is used to store the user's cookie consent preferences.
-
Cookie Preferences
This cookie is used to store the user's cookie consent preferences.
-
Cookie Preferences
This cookie is used to store the user's cookie consent preferences.
-
Cookie Preferences
This cookie is used to store the user's cookie consent preferences.
-
Cookie Preferences
This cookie is used to store the user's cookie consent preferences.
-
Cookie Preferences
This cookie is used to store the user's cookie consent preferences.
-
Cookie Preferences
This cookie is used to store the user's cookie consent preferences.
-
Cookie Preferences
This cookie is used to store the user's cookie consent preferences.
-
Cookie Preferences
This cookie is used to store the user's cookie consent preferences.
-
Cookie Preferences
This cookie is used to store the user's cookie consent preferences.
-
Cookie Preferences
This cookie is used to store the user's cookie consent preferences.
-
Cookie Preferences
This cookie is used to store the user's cookie consent preferences.
-
Cookie Preferences
This cookie is used to store the user's cookie consent preferences.
-
Cookie Preferences
This cookie is used to store the user's cookie consent preferences.
-
Cookie Preferences
This cookie is used to store the user's cookie consent preferences.
-
Cookie Preferences
This cookie is used to store the user's cookie consent preferences.
-
Cookie Preferences
This cookie is used to store the user's cookie consent preferences.
-
Cookie Preferences
This cookie is used to store the user's cookie consent preferences.
-
Cookie Preferences
This cookie is used to store the user's cookie consent preferences.
-
Cookie Preferences
This cookie is used to store the user's cookie consent preferences.
-
Cookie Preferences
This cookie is used to store the user's cookie consent preferences.
-
Cookie Preferences
This cookie is used to store the user's cookie consent preferences.
-
Cookie Preferences
This cookie is used to store the user's cookie consent preferences.
-
Cookie Preferences
This cookie is used to store the user's cookie consent preferences.
-
Cookie Preferences
This cookie is used to store the user's cookie consent preferences.
-
Cookie Preferences
This cookie is used to store the user's cookie consent preferences.
-
Cookie Preferences
This cookie is used to store the user's cookie consent preferences.
-
Cookie Preferences
This cookie is used to store the user's cookie consent preferences.
-
Cookie Preferences
This cookie is used to store the user's cookie consent preferences.
-
Cookie Preferences
This cookie is used to store the user's cookie consent preferences.
-
Cookie Preferences
This cookie is used to store the user's cookie consent preferences.
-
Cookie Preferences
This cookie is used to store the user's cookie consent preferences.
-
Cookie Preferences
This cookie is used to store the user's cookie consent preferences.
-
Cookie Preferences
This cookie is used to store the user's cookie consent preferences.
-
Cookie Preferences
This cookie is used to store the user's cookie consent preferences.
-
Cookie Preferences
This cookie is used to store the user's cookie consent preferences.
-
Cookie Preferences
This cookie is used to store the user's cookie consent preferences.
-
Cookie Preferences
This cookie is used to store the user's cookie consent preferences.
-
Cookie Preferences
This cookie is used to store the user's cookie consent preferences.
-
Cookie Preferences
This cookie is used to store the user's cookie consent preferences.
-
Cookie Preferences
This cookie is used to store the user's cookie consent preferences.
-
Cookie Preferences
This cookie is used to store the user's cookie consent preferences.
-
Cookie Preferences
This cookie is used to store the user's cookie consent preferences.
-
Cookie Preferences
This cookie is used to store the user's cookie consent preferences.
-
Cookie Preferences
This cookie is used to store the user's cookie consent preferences.
-
Cookie Preferences
This cookie is used to store the user's cookie consent preferences.
-
Cookie Preferences
This cookie is used to store the user's cookie consent preferences.
-
Cookie Preferences
This cookie is used to store the user's cookie consent preferences.
-
Cookie Preferences
This cookie is used to store the user's cookie consent preferences.
-
Cookie Preferences
This cookie is used to store the user's cookie consent preferences.
-
Cookie Preferences
This cookie is used to store the user's cookie consent preferences.
-
Cookie Preferences
This cookie is used to store the user's cookie consent preferences.
-
Cookie Preferences
This cookie is used to store the user's cookie consent preferences.
-
Cookie Preferences
This cookie is used to store the user's cookie consent preferences.
-
Cookie Preferences
This cookie is used to store the user's cookie consent preferences.
-
Cookie Preferences
This cookie is used to store the user's cookie consent preferences.
-
Cookie Preferences
This cookie is used to store the user's cookie consent preferences.
-
Cookie Preferences
This cookie is used to store the user's cookie consent preferences.
-
Cookie Preferences
This cookie is used to store the user's cookie consent preferences.
-
Cookie Preferences
This cookie is used to store the user's cookie consent preferences.
-
Cookie Preferences
This cookie is used to store the user's cookie consent preferences.
-
Cookie Preferences
This cookie is used to store the user's cookie consent preferences.
-
Cookie Preferences
This cookie is used to store the user's cookie consent preferences.
-
Cookie Preferences
This cookie is used to store the user's cookie consent preferences.
-
Cookie Preferences
This cookie is used to store the user's cookie consent preferences.
-
Cookie Preferences
This cookie is used to store the user's cookie consent preferences.
-
Cookie Preferences
This cookie is used to store the user's cookie consent preferences.
-
Cookie Preferences
This cookie is used to store the user's cookie consent preferences.
-
Cookie Preferences
This cookie is used to store the user's cookie consent preferences.
-
Cookie Preferences
This cookie is used to store the user's cookie consent preferences.
-
Cookie Preferences
This cookie is used to store the user's cookie consent preferences.
-
Cookie Preferences
This cookie is used to store the user's cookie consent preferences.
-
Cookie Preferences
This cookie is used to store the user's cookie consent preferences.
-
Cookie Preferences
This cookie is used to store the user's cookie consent preferences.
-
Cookie Preferences
This cookie is used to store the user's cookie consent preferences.
-
Cookie Preferences
This cookie is used to store the user's cookie consent preferences.
-
Cookie Preferences
This cookie is used to store the user's cookie consent preferences.
-
Cookie Preferences
This cookie is used to store the user's cookie consent preferences.
-
Cookie Preferences
This cookie is used to store the user's cookie consent preferences.
-
Cookie Preferences
This cookie is used to store the user's cookie consent preferences.
-
Cookie Preferences
This cookie is used to store the user's cookie consent preferences.
-
Cookie Preferences
This cookie is used to store the user's cookie consent preferences.
-
Cookie Preferences
This cookie is used to store the user's cookie consent preferences.
-
Cookie Preferences
This cookie is used to store the user's cookie consent preferences.
-
Cookie Preferences
This cookie is used to store the user's cookie consent preferences.
-
Cookie Preferences
This cookie is used to store the user's cookie consent preferences.
-
Cookie Preferences
This cookie is used to store the user's cookie consent preferences.
-
Cookie Preferences
This cookie is used to store the user's cookie consent preferences.
-
Cookie Preferences
This cookie is used to store the user's cookie consent preferences.
-
Cookie Preferences
This cookie is used to store the user's cookie consent preferences.
-
Cookie Preferences
This cookie is used to store the user's cookie consent preferences.
-
Cookie Preferences
This cookie is used to store the user's cookie consent preferences.
-
Cookie Preferences
This cookie is used to store the user's cookie consent preferences.
-
Cookie Preferences
This cookie is used to store the user's cookie consent preferences.
-
Cookie Preferences
This cookie is used to store the user's cookie consent preferences.
-
Cookie Preferences
This cookie is used to store the user's cookie consent preferences.
-
Cookie Preferences
This cookie is used to store the user's cookie consent preferences.
-
Cookie Preferences
This cookie is used to store the user's cookie consent preferences.
-
Cookie Preferences
This cookie is used to store the user's cookie consent preferences.
-
Cookie Preferences
This cookie is used to store the user's cookie consent preferences.
-
Cookie Preferences
This cookie is used to store the user's cookie consent preferences.
-
Cookie Preferences
This cookie is used to store the user's cookie consent preferences.
-
Cookie Preferences
This cookie is used to store the user's cookie consent preferences.
-
Cookie Preferences
This cookie is used to store the user's cookie consent preferences.
-
Cookie Preferences
This cookie is used to store the user's cookie consent preferences.
-
Cookie Preferences
This cookie is used to store the user's cookie consent preferences.
-
Cookie Preferences
This cookie is used to store the user's cookie consent preferences.
-
Cookie Preferences
This cookie is used to store the user's cookie consent preferences.
-
Cookie Preferences
This cookie is used to store the user's cookie consent preferences.
-
Cookie Preferences
This cookie is used to store the user's cookie consent preferences.
-
Cookie Preferences
This cookie is used to store the user's cookie consent preferences.
-
Cookie Preferences
This cookie is used to store the user's cookie consent preferences.
-
Cookie Preferences
This cookie is used to store the user's cookie consent preferences.
-
Cookie Preferences
This cookie is used to store the user's cookie consent preferences.
-
Cookie Preferences
This cookie is used to store the user's cookie consent preferences.
-
Cookie Preferences
This cookie is used to store the user's cookie consent preferences.
-
Cookie Preferences
This cookie is used to store the user's cookie consent preferences.
-
Cookie Preferences
This cookie is used to store the user's cookie consent preferences.
-
Cookie Preferences
This cookie is used to store the user's cookie consent preferences.
-
Cookie Preferences
This cookie is used to store the user's cookie consent preferences.
-
Cookie Preferences
This cookie is used to store the user's cookie consent preferences.
-
Cookie Preferences
This cookie is used to store the user's cookie consent preferences.
-
Cookie Preferences
This cookie is used to store the user's cookie consent preferences.
-
Cookie Preferences
This cookie is used to store the user's cookie consent preferences.
-
Cookie Preferences
This cookie is used to store the user's cookie consent preferences.
-
Cookie Preferences
This cookie is used to store the user's cookie consent preferences.
-
Cookie Preferences
This cookie is used to store the user's cookie consent preferences.
-
Cookie Preferences
This cookie is used to store the user's cookie consent preferences.
-
Cookie Preferences
This cookie is used to store the user's cookie consent preferences.
-
Cookie Preferences
This cookie is used to store the user's cookie consent preferences.
-
Cookie Preferences
This cookie is used to store the user's cookie consent preferences.
-
Cookie Preferences
This cookie is used to store the user's cookie consent preferences.
-
Cookie Preferences
This cookie is used to store the user's cookie consent preferences.
-
Cookie Preferences
This cookie is used to store the user's cookie consent preferences.
-
Cookie Preferences
This cookie is used to store the user's cookie consent preferences.
-
Cookie Preferences
This cookie is used to store the user's cookie consent preferences.
-
Cookie Preferences
This cookie is used to store the user's cookie consent preferences.
-
Cookie Preferences
This cookie is used to store the user's cookie consent preferences.
-
Cookie Preferences
This cookie is used to store the user's cookie consent preferences.
-
Cookie Preferences
This cookie is used to store the user's cookie consent preferences.
-
Cookie Preferences
This cookie is used to store the user's cookie consent preferences.
-
Cookie Preferences
This cookie is used to store the user's cookie consent preferences.
-
Cookie Preferences
This cookie is used to store the user's cookie consent preferences.
-
Cookie Preferences
This cookie is used to store the user's cookie consent preferences.
-
Cookie Preferences
This cookie is used to store the user's cookie consent preferences.
-
Cookie Preferences
This cookie is used to store the user's cookie consent preferences.
-
Cookie Preferences
This cookie is used to store the user's cookie consent preferences.
-
Cookie Preferences
This cookie is used to store the user's cookie consent preferences.
-
Cookie Preferences
This cookie is used to store the user's cookie consent preferences.
-
Cookie Preferences
This cookie is used to store the user's cookie consent preferences.
-
Cookie Preferences
This cookie is used to store the user's cookie consent preferences.
-
Cookie Preferences
This cookie is used to store the user's cookie consent preferences.
-
Cookie Preferences
This cookie is used to store the user's cookie consent preferences.
-
Cookie Preferences
This cookie is used to store the user's cookie consent preferences.
-
Cookie Preferences
This cookie is used to store the user's cookie consent preferences.
-
Cookie Preferences
This cookie is used to store the user's cookie consent preferences.
-
Cookie Preferences
This cookie is used to store the user's cookie consent preferences.
-
Cookie Preferences
This cookie is used to store the user's cookie consent preferences.
-
Cookie Preferences
This cookie is used to store the user's cookie consent preferences.
-
Cookie Preferences
This cookie is used to store the user's cookie consent preferences.
-
Cookie Preferences
This cookie is used to store the user's cookie consent preferences.
-
Cookie Preferences
This cookie is used to store the user's cookie consent preferences.
-
Cookie Preferences
This cookie is used to store the user's cookie consent preferences.
-
Cookie Preferences
This cookie is used to store the user's cookie consent preferences.
-
Cookie Preferences
This cookie is used to store the user's cookie consent preferences.
-
Cookie Preferences
This cookie is used to store the user's cookie consent preferences.
-
Cookie Preferences
This cookie is used to store the user's cookie consent preferences.
-
Cookie Preferences
This cookie is used to store the user's cookie consent preferences.
-
Cookie Preferences
This cookie is used to store the user's cookie consent preferences.
-
Cookie Preferences
This cookie is used to store the user's cookie consent preferences.
-
Cookie Preferences
This cookie is used to store the user's cookie consent preferences.
-
Cookie Preferences
This cookie is used to store the user's cookie consent preferences.
-
Cookie Preferences
This cookie is used to store the user's cookie consent preferences.
-
Cookie Preferences
This cookie is used to store the user's cookie consent preferences.
-
Cookie Preferences
This cookie is used to store the user's cookie consent preferences.
-
Cookie Preferences
This cookie is used to store the user's cookie consent preferences.
-
Cookie Preferences
This cookie is used to store the user's cookie consent preferences.
-
Cookie Preferences
This cookie is used to store the user's cookie consent preferences.
-
Cookie Preferences
This cookie is used to store the user's cookie consent preferences.
-
Cookie Preferences
This cookie is used to store the user's cookie consent preferences.
-
Cookie Preferences
This cookie is used to store the user's cookie consent preferences.
-
Cookie Preferences
This cookie is used to store the user's cookie consent preferences.
-
Cookie Preferences
This cookie is used to store the user's cookie consent preferences.
-
Cookie Preferences
This cookie is used to store the user's cookie consent preferences.
-
Cookie Preferences
This cookie is used to store the user's cookie consent preferences.
-
Cookie Preferences
This cookie is used to store the user's cookie consent preferences.
-
Cookie Preferences
This cookie is used to store the user's cookie consent preferences.
-
Cookie Preferences
This cookie is used to store the user's cookie consent preferences.
-
Cookie Preferences
This cookie is used to store the user's cookie consent preferences.
-
Cookie Preferences
This cookie is used to store the user's cookie consent preferences.
-
Cookie Preferences
This cookie is used to store the user's cookie consent preferences.
-
Cookie Preferences
This cookie is used to store the user's cookie consent preferences.
-
Cookie Preferences
This cookie is used to store the user's cookie consent preferences.
-
Cookie Preferences
This cookie is used to store the user's cookie consent preferences.
-
Cookie Preferences
This cookie is used to store the user's cookie consent preferences.
-
Cookie Preferences
This cookie is used to store the user's cookie consent preferences.
-
Cookie Preferences
This cookie is used to store the user's cookie consent preferences.
-
Cookie Preferences
This cookie is used to store the user's cookie consent preferences.
-
Cookie Preferences
This cookie is used to store the user's cookie consent preferences.
-
Cookie Preferences
This cookie is used to store the user's cookie consent preferences.
-
Cookie Preferences
This cookie is used to store the user's cookie consent preferences.
-
Cookie Preferences
This cookie is used to store the user's cookie consent preferences.
-
Cookie Preferences
This cookie is used to store the user's cookie consent preferences.
-
Cookie Preferences
This cookie is used to store the user's cookie consent preferences.
-
Cookie Preferences
This cookie is used to store the user's cookie consent preferences.
-
Cookie Preferences
This cookie is used to store the user's cookie consent preferences.
-
Cookie Preferences
This cookie is used to store the user's cookie consent preferences.
-
Cookie Preferences
This cookie is used to store the user's cookie consent preferences.
-
Cookie Preferences
This cookie is used to store the user's cookie consent preferences.
-
Cookie Preferences
This cookie is used to store the user's cookie consent preferences.
-
Cookie Preferences
This cookie is used to store the user's cookie consent preferences.
-
Cookie Preferences
This cookie is used to store the user's cookie consent preferences.
-
Cookie Preferences
This cookie is used to store the user's cookie consent preferences.
-
Cookie Preferences
This cookie is used to store the user's cookie consent preferences.
-
Cookie Preferences
This cookie is used to store the user's cookie consent preferences.
-
Cookie Preferences
This cookie is used to store the user's cookie consent preferences.
-
Cookie Preferences
This cookie is used to store the user's cookie consent preferences.
-
Cookie Preferences
This cookie is used to store the user's cookie consent preferences.
-
Cookie Preferences
This cookie is used to store the user's cookie consent preferences.
-
Cookie Preferences
This cookie is used to store the user's cookie consent preferences.
-
Cookie Preferences
This cookie is used to store the user's cookie consent preferences.
-
Cookie Preferences
This cookie is used to store the user's cookie consent preferences.
-
Cookie Preferences
This cookie is used to store the user's cookie consent preferences.
-
Cookie Preferences
This cookie is used to store the user's cookie consent preferences.
-
Cookie Preferences
This cookie is used to store the user's cookie consent preferences.
-
Cookie Preferences
This cookie is used to store the user's cookie consent preferences.
-
Cookie Preferences
This cookie is used to store the user's cookie consent preferences.
-
Cookie Preferences
This cookie is used to store the user's cookie consent preferences.
-
Cookie Preferences
This cookie is used to store the user's cookie consent preferences.
-
Cookie Preferences
This cookie is used to store the user's cookie consent preferences.
-
Cookie Preferences
This cookie is used to store the user's cookie consent preferences.
-
Cookie Preferences
This cookie is used to store the user's cookie consent preferences.
-
Cookie Preferences
This cookie is used to store the user's cookie consent preferences.
-
Cookie Preferences
This cookie is used to store the user's cookie consent preferences.
-
Cookie Preferences
This cookie is used to store the user's cookie consent preferences.
-
Cookie Preferences
This cookie is used to store the user's cookie consent preferences.
-
Cookie Preferences
This cookie is used to store the user's cookie consent preferences.
-
Cookie Preferences
This cookie is used to store the user's cookie consent preferences.
-
Cookie Preferences
This cookie is used to store the user's cookie consent preferences.
-
Cookie Preferences
This cookie is used to store the user's cookie consent preferences.
-
Cookie Preferences
This cookie is used to store the user's cookie consent preferences.
-
Cookie Preferences
This cookie is used to store the user's cookie consent preferences.
-
Cookie Preferences
This cookie is used to store the user's cookie consent preferences.
-
Cookie Preferences
This cookie is used to store the user's cookie consent preferences.
-
Cookie Preferences
This cookie is used to store the user's cookie consent preferences.
-
Cookie Preferences
This cookie is used to store the user's cookie consent preferences.
-
Cookie Preferences
This cookie is used to store the user's cookie consent preferences.
-
Cookie Preferences
This cookie is used to store the user's cookie consent preferences.
-
Cookie Preferences
This cookie is used to store the user's cookie consent preferences.
-
Cookie Preferences
This cookie is used to store the user's cookie consent preferences.
-
Cookie Preferences
This cookie is used to store the user's cookie consent preferences.
-
Cookie Preferences
This cookie is used to store the user's cookie consent preferences.
-
Cookie Preferences
This cookie is used to store the user's cookie consent preferences.
-
Cookie Preferences
This cookie is used to store the user's cookie consent preferences.
-
Cookie Preferences
This cookie is used to store the user's cookie consent preferences.
-
Cookie Preferences
This cookie is used to store the user's cookie consent preferences.
-
Cookie Preferences
This cookie is used to store the user's cookie consent preferences.
-
Cookie Preferences
This cookie is used to store the user's cookie consent preferences.
-
Cookie Preferences
This cookie is used to store the user's cookie consent preferences.
-
Cookie Preferences
This cookie is used to store the user's cookie consent preferences.
-
Cookie Preferences
This cookie is used to store the user's cookie consent preferences.
-
Cookie Preferences
This cookie is used to store the user's cookie consent preferences.
-
Cookie Preferences
This cookie is used to store the user's cookie consent preferences.
-
Cookie Preferences
This cookie is used to store the user's cookie consent preferences.
-
Cookie Preferences
This cookie is used to store the user's cookie consent preferences.
-
Cookie Preferences
This cookie is used to store the user's cookie consent preferences.
-
Cookie Preferences
This cookie is used to store the user's cookie consent preferences.
-
Cookie Preferences
This cookie is used to store the user's cookie consent preferences.
-
Cookie Preferences
This cookie is used to store the user's cookie consent preferences.
-
Cookie Preferences
This cookie is used to store the user's cookie consent preferences.
-
Cookie Preferences
This cookie is used to store the user's cookie consent preferences.
-
Cookie Preferences
This cookie is used to store the user's cookie consent preferences.
-
Cookie Preferences
This cookie is used to store the user's cookie consent preferences.
-
Cookie Preferences
This cookie is used to store the user's cookie consent preferences.
-
Cookie Preferences
This cookie is used to store the user's cookie consent preferences.
-
Cookie Preferences
This cookie is used to store the user's cookie consent preferences.
-
Cookie Preferences
This cookie is used to store the user's cookie consent preferences.
-
Cookie Preferences
This cookie is used to store the user's cookie consent preferences.
-
Cookie Preferences
This cookie is used to store the user's cookie consent preferences.
-
Cookie Preferences
This cookie is used to store the user's cookie consent preferences.
-
Cookie Preferences
This cookie is used to store the user's cookie consent preferences.
-
Cookie Preferences
This cookie is used to store the user's cookie consent preferences.
-
Cookie Preferences
This cookie is used to store the user's cookie consent preferences.
-
Cookie Preferences
This cookie is used to store the user's cookie consent preferences.
-
Cookie Preferences
This cookie is used to store the user's cookie consent preferences.
-
Cookie Preferences
This cookie is used to store the user's cookie consent preferences.
-
Cookie Preferences
This cookie is used to store the user's cookie consent preferences.
-
Cookie Preferences
This cookie is used to store the user's cookie consent preferences.
-
Cookie Preferences
This cookie is used to store the user's cookie consent preferences.
-
Cookie Preferences
This cookie is used to store the user's cookie consent preferences.
-
Cookie Preferences
This cookie is used to store the user's cookie consent preferences.
-
Cookie Preferences
This cookie is used to store the user's cookie consent preferences.
-
Cookie Preferences
This cookie is used to store the user's cookie consent preferences.
-
Cookie Preferences
This cookie is used to store the user's cookie consent preferences.
-
Cookie Preferences
This cookie is used to store the user's cookie consent preferences.
-
Cookie Preferences
This cookie is used to store the user's cookie consent preferences.
-
Cookie Preferences
This cookie is used to store the user's cookie consent preferences.
-
Cookie Preferences
This cookie is used to store the user's cookie consent preferences.
-
Cookie Preferences
This cookie is used to store the user's cookie consent preferences.
-
Cookie Preferences
This cookie is used to store the user's cookie consent preferences.
-
Cookie Preferences
This cookie is used to store the user's cookie consent preferences.
-
Cookie Preferences
This cookie is used to store the user's cookie consent preferences.
-
Cookie Preferences
This cookie is used to store the user's cookie consent preferences.
-
Cookie Preferences
This cookie is used to store the user's cookie consent preferences.
-
Cookie Preferences
This cookie is used to store the user's cookie consent preferences.
-
Cookie Preferences
This cookie is used to store the user's cookie consent preferences.
-
Cookie Preferences
This cookie is used to store the user's cookie consent preferences.
-
Cookie Preferences
This cookie is used to store the user's cookie consent preferences.
-
Cookie Preferences
This cookie is used to store the user's cookie consent preferences.
-
Cookie Preferences
This cookie is used to store the user's cookie consent preferences.
-
Cookie Preferences
This cookie is used to store the user's cookie consent preferences.
-
Cookie Preferences
This cookie is used to store the user's cookie consent preferences.
-
Cookie Preferences
This cookie is used to store the user's cookie consent preferences.
-
Cookie Preferences
This cookie is used to store the user's cookie consent preferences.
-
Cookie Preferences
This cookie is used to store the user's cookie consent preferences.
-
Cookie Preferences
This cookie is used to store the user's cookie consent preferences.
-
Cookie Preferences
This cookie is used to store the user's cookie consent preferences.
-
Cookie Preferences
This cookie is used to store the user's cookie consent preferences.
-
Cookie Preferences
This cookie is used to store the user's cookie consent preferences.
-
Cookie Preferences
This cookie is used to store the user's cookie consent preferences.
-
Cookie Preferences
This cookie is used to store the user's cookie consent preferences.
-
Cookie Preferences
This cookie is used to store the user's cookie consent preferences.
30 days
Cookie Preferences
This cookie is used to store the user's cookie consent preferences.
30 days
Cookie Preferences
This cookie is used to store the user's cookie consent preferences.
30 days
Cookie Preferences
This cookie is used to store the user's cookie consent preferences.
30 days
Cookie Preferences
This cookie is used to store the user's cookie consent preferences.
30 days
Cookie Preferences
This cookie is used to store the user's cookie consent preferences.
30 days
Cookie Preferences
This cookie is used to store the user's cookie consent preferences.
30 days
Cookie Preferences
This cookie is used to store the user's cookie consent preferences.
30 days
Cookie Preferences
This cookie is used to store the user's cookie consent preferences.
30 days
Cookie Preferences
This cookie is used to store the user's cookie consent preferences.
30 days
Cookie Preferences
This cookie is used to store the user's cookie consent preferences.
30 days
Cookie Preferences
This cookie is used to store the user's cookie consent preferences.
30 days
Cookie Preferences
This cookie is used to store the user's cookie consent preferences.
30 days
Cookie Preferences
This cookie is used to store the user's cookie consent preferences.
30 days
Cookie Preferences
This cookie is used to store the user's cookie consent preferences.
30 days
Cookie Preferences
This cookie is used to store the user's cookie consent preferences.
30 days


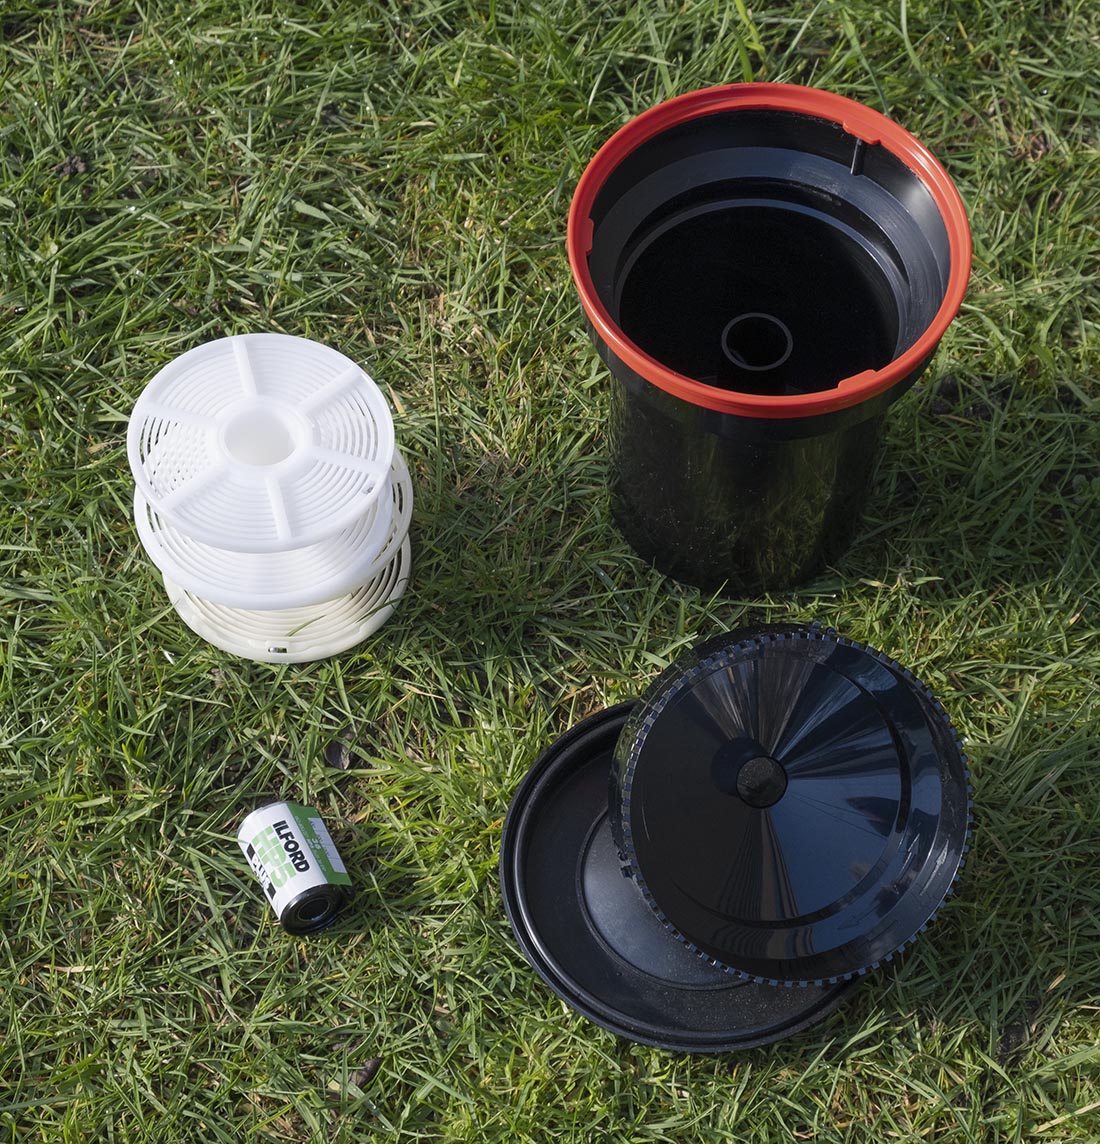
2 replies on “Experiments in Developing Film with Chocolate”
Jaime Adams
I’m so glad to see this post! I’ve been experimenting with plant developers and my negatives come out extremely dense/dark. The recipes that I have seen call for more than twice the amount of washing soda than yours, as well as more vitamin c. Do you think the washing soda is causing the thick negatives? Is it overdeveloping or something else? I also use 30c rather than your 26c and am wondering what kind of a difference the temperature makes.
I started using plant developers right away due to being highly allergic to regular developers so my knowledge of an ideal negative is slim and I’d love help troubleshooting. I usually use Ilford HP5.
Kathy K
Hi Jaime, Thank you for your comments. I’m happy to hear you are trying plant developers too. I also started out with a recipe that used much more washing soda and found my negatives to be dense, and fogged. Are the edges of the film dark too or just the image area? If the edges are dark then it is also fogging that you see. The temperature will definitely affect the image, warmer developer is going to be more active, which will increase density. Please feel free to e-mail me with more questions! I’d love to hear what is working for you too.
Comments are closed.