Essential cookies enable basic functions and are necessary for the proper function of the website.
Cookie Preferences
This cookie is used to store the user's cookie consent preferences.
30 days
Cookie Preferences
This cookie is used to store the user's cookie consent preferences.
-
Cookie Preferences
This cookie is used to store the user's cookie consent preferences.
-
Cookie Preferences
This cookie is used to store the user's cookie consent preferences.
-
Cookie Preferences
This cookie is used to store the user's cookie consent preferences.
-
Cookie Preferences
This cookie is used to store the user's cookie consent preferences.
-
Cookie Preferences
This cookie is used to store the user's cookie consent preferences.
-
Cookie Preferences
This cookie is used to store the user's cookie consent preferences.
-
Cookie Preferences
This cookie is used to store the user's cookie consent preferences.
-
Cookie Preferences
This cookie is used to store the user's cookie consent preferences.
-
Cookie Preferences
This cookie is used to store the user's cookie consent preferences.
-
Cookie Preferences
This cookie is used to store the user's cookie consent preferences.
-
Cookie Preferences
This cookie is used to store the user's cookie consent preferences.
-
Cookie Preferences
This cookie is used to store the user's cookie consent preferences.
-
Cookie Preferences
This cookie is used to store the user's cookie consent preferences.
-
Cookie Preferences
This cookie is used to store the user's cookie consent preferences.
-
Cookie Preferences
This cookie is used to store the user's cookie consent preferences.
-
Cookie Preferences
This cookie is used to store the user's cookie consent preferences.
-
Cookie Preferences
This cookie is used to store the user's cookie consent preferences.
-
Cookie Preferences
This cookie is used to store the user's cookie consent preferences.
-
Cookie Preferences
This cookie is used to store the user's cookie consent preferences.
-
Cookie Preferences
This cookie is used to store the user's cookie consent preferences.
-
Cookie Preferences
This cookie is used to store the user's cookie consent preferences.
-
Cookie Preferences
This cookie is used to store the user's cookie consent preferences.
-
Cookie Preferences
This cookie is used to store the user's cookie consent preferences.
-
Cookie Preferences
This cookie is used to store the user's cookie consent preferences.
-
Cookie Preferences
This cookie is used to store the user's cookie consent preferences.
-
Cookie Preferences
This cookie is used to store the user's cookie consent preferences.
-
Cookie Preferences
This cookie is used to store the user's cookie consent preferences.
-
Cookie Preferences
This cookie is used to store the user's cookie consent preferences.
-
Cookie Preferences
This cookie is used to store the user's cookie consent preferences.
-
Cookie Preferences
This cookie is used to store the user's cookie consent preferences.
-
Cookie Preferences
This cookie is used to store the user's cookie consent preferences.
-
Cookie Preferences
This cookie is used to store the user's cookie consent preferences.
-
Cookie Preferences
This cookie is used to store the user's cookie consent preferences.
-
Cookie Preferences
This cookie is used to store the user's cookie consent preferences.
-
Cookie Preferences
This cookie is used to store the user's cookie consent preferences.
-
Cookie Preferences
This cookie is used to store the user's cookie consent preferences.
-
Cookie Preferences
This cookie is used to store the user's cookie consent preferences.
-
Cookie Preferences
This cookie is used to store the user's cookie consent preferences.
-
Cookie Preferences
This cookie is used to store the user's cookie consent preferences.
-
Cookie Preferences
This cookie is used to store the user's cookie consent preferences.
-
Cookie Preferences
This cookie is used to store the user's cookie consent preferences.
-
Cookie Preferences
This cookie is used to store the user's cookie consent preferences.
-
Cookie Preferences
This cookie is used to store the user's cookie consent preferences.
-
Cookie Preferences
This cookie is used to store the user's cookie consent preferences.
-
Cookie Preferences
This cookie is used to store the user's cookie consent preferences.
-
Cookie Preferences
This cookie is used to store the user's cookie consent preferences.
-
Cookie Preferences
This cookie is used to store the user's cookie consent preferences.
-
Cookie Preferences
This cookie is used to store the user's cookie consent preferences.
-
Cookie Preferences
This cookie is used to store the user's cookie consent preferences.
-
Cookie Preferences
This cookie is used to store the user's cookie consent preferences.
-
Cookie Preferences
This cookie is used to store the user's cookie consent preferences.
-
Cookie Preferences
This cookie is used to store the user's cookie consent preferences.
-
Cookie Preferences
This cookie is used to store the user's cookie consent preferences.
-
Cookie Preferences
This cookie is used to store the user's cookie consent preferences.
-
Cookie Preferences
This cookie is used to store the user's cookie consent preferences.
-
Cookie Preferences
This cookie is used to store the user's cookie consent preferences.
-
Cookie Preferences
This cookie is used to store the user's cookie consent preferences.
-
Cookie Preferences
This cookie is used to store the user's cookie consent preferences.
-
Cookie Preferences
This cookie is used to store the user's cookie consent preferences.
-
Cookie Preferences
This cookie is used to store the user's cookie consent preferences.
-
Cookie Preferences
This cookie is used to store the user's cookie consent preferences.
-
Cookie Preferences
This cookie is used to store the user's cookie consent preferences.
-
Cookie Preferences
This cookie is used to store the user's cookie consent preferences.
-
Cookie Preferences
This cookie is used to store the user's cookie consent preferences.
-
Cookie Preferences
This cookie is used to store the user's cookie consent preferences.
-
Cookie Preferences
This cookie is used to store the user's cookie consent preferences.
-
Cookie Preferences
This cookie is used to store the user's cookie consent preferences.
-
Cookie Preferences
This cookie is used to store the user's cookie consent preferences.
-
Cookie Preferences
This cookie is used to store the user's cookie consent preferences.
-
Cookie Preferences
This cookie is used to store the user's cookie consent preferences.
-
Cookie Preferences
This cookie is used to store the user's cookie consent preferences.
-
Cookie Preferences
This cookie is used to store the user's cookie consent preferences.
-
Cookie Preferences
This cookie is used to store the user's cookie consent preferences.
-
Cookie Preferences
This cookie is used to store the user's cookie consent preferences.
-
Cookie Preferences
This cookie is used to store the user's cookie consent preferences.
-
Cookie Preferences
This cookie is used to store the user's cookie consent preferences.
-
Cookie Preferences
This cookie is used to store the user's cookie consent preferences.
-
Cookie Preferences
This cookie is used to store the user's cookie consent preferences.
-
Cookie Preferences
This cookie is used to store the user's cookie consent preferences.
-
Cookie Preferences
This cookie is used to store the user's cookie consent preferences.
-
Cookie Preferences
This cookie is used to store the user's cookie consent preferences.
-
Cookie Preferences
This cookie is used to store the user's cookie consent preferences.
-
Cookie Preferences
This cookie is used to store the user's cookie consent preferences.
-
Cookie Preferences
This cookie is used to store the user's cookie consent preferences.
-
Cookie Preferences
This cookie is used to store the user's cookie consent preferences.
-
Cookie Preferences
This cookie is used to store the user's cookie consent preferences.
-
Cookie Preferences
This cookie is used to store the user's cookie consent preferences.
-
Cookie Preferences
This cookie is used to store the user's cookie consent preferences.
-
Cookie Preferences
This cookie is used to store the user's cookie consent preferences.
-
Cookie Preferences
This cookie is used to store the user's cookie consent preferences.
-
Cookie Preferences
This cookie is used to store the user's cookie consent preferences.
-
Cookie Preferences
This cookie is used to store the user's cookie consent preferences.
-
Cookie Preferences
This cookie is used to store the user's cookie consent preferences.
-
Cookie Preferences
This cookie is used to store the user's cookie consent preferences.
-
Cookie Preferences
This cookie is used to store the user's cookie consent preferences.
-
Cookie Preferences
This cookie is used to store the user's cookie consent preferences.
-
Cookie Preferences
This cookie is used to store the user's cookie consent preferences.
-
Cookie Preferences
This cookie is used to store the user's cookie consent preferences.
-
Cookie Preferences
This cookie is used to store the user's cookie consent preferences.
-
Cookie Preferences
This cookie is used to store the user's cookie consent preferences.
-
Cookie Preferences
This cookie is used to store the user's cookie consent preferences.
-
Cookie Preferences
This cookie is used to store the user's cookie consent preferences.
-
Cookie Preferences
This cookie is used to store the user's cookie consent preferences.
-
Cookie Preferences
This cookie is used to store the user's cookie consent preferences.
-
Cookie Preferences
This cookie is used to store the user's cookie consent preferences.
-
Cookie Preferences
This cookie is used to store the user's cookie consent preferences.
-
Cookie Preferences
This cookie is used to store the user's cookie consent preferences.
-
Cookie Preferences
This cookie is used to store the user's cookie consent preferences.
-
Cookie Preferences
This cookie is used to store the user's cookie consent preferences.
-
Cookie Preferences
This cookie is used to store the user's cookie consent preferences.
-
Cookie Preferences
This cookie is used to store the user's cookie consent preferences.
-
Cookie Preferences
This cookie is used to store the user's cookie consent preferences.
-
Cookie Preferences
This cookie is used to store the user's cookie consent preferences.
-
Cookie Preferences
This cookie is used to store the user's cookie consent preferences.
-
Cookie Preferences
This cookie is used to store the user's cookie consent preferences.
-
Cookie Preferences
This cookie is used to store the user's cookie consent preferences.
-
Cookie Preferences
This cookie is used to store the user's cookie consent preferences.
-
Cookie Preferences
This cookie is used to store the user's cookie consent preferences.
-
Cookie Preferences
This cookie is used to store the user's cookie consent preferences.
-
Cookie Preferences
This cookie is used to store the user's cookie consent preferences.
-
Cookie Preferences
This cookie is used to store the user's cookie consent preferences.
-
Cookie Preferences
This cookie is used to store the user's cookie consent preferences.
-
Cookie Preferences
This cookie is used to store the user's cookie consent preferences.
-
Cookie Preferences
This cookie is used to store the user's cookie consent preferences.
-
Cookie Preferences
This cookie is used to store the user's cookie consent preferences.
-
Cookie Preferences
This cookie is used to store the user's cookie consent preferences.
-
Cookie Preferences
This cookie is used to store the user's cookie consent preferences.
-
Cookie Preferences
This cookie is used to store the user's cookie consent preferences.
-
Cookie Preferences
This cookie is used to store the user's cookie consent preferences.
-
Cookie Preferences
This cookie is used to store the user's cookie consent preferences.
-
Cookie Preferences
This cookie is used to store the user's cookie consent preferences.
-
Cookie Preferences
This cookie is used to store the user's cookie consent preferences.
-
Cookie Preferences
This cookie is used to store the user's cookie consent preferences.
-
Cookie Preferences
This cookie is used to store the user's cookie consent preferences.
-
Cookie Preferences
This cookie is used to store the user's cookie consent preferences.
-
Cookie Preferences
This cookie is used to store the user's cookie consent preferences.
-
Cookie Preferences
This cookie is used to store the user's cookie consent preferences.
-
Cookie Preferences
This cookie is used to store the user's cookie consent preferences.
-
Cookie Preferences
This cookie is used to store the user's cookie consent preferences.
-
Cookie Preferences
This cookie is used to store the user's cookie consent preferences.
-
Cookie Preferences
This cookie is used to store the user's cookie consent preferences.
-
Cookie Preferences
This cookie is used to store the user's cookie consent preferences.
-
Cookie Preferences
This cookie is used to store the user's cookie consent preferences.
-
Cookie Preferences
This cookie is used to store the user's cookie consent preferences.
-
Cookie Preferences
This cookie is used to store the user's cookie consent preferences.
-
Cookie Preferences
This cookie is used to store the user's cookie consent preferences.
-
Cookie Preferences
This cookie is used to store the user's cookie consent preferences.
-
Cookie Preferences
This cookie is used to store the user's cookie consent preferences.
-
Cookie Preferences
This cookie is used to store the user's cookie consent preferences.
-
Cookie Preferences
This cookie is used to store the user's cookie consent preferences.
-
Cookie Preferences
This cookie is used to store the user's cookie consent preferences.
-
Cookie Preferences
This cookie is used to store the user's cookie consent preferences.
-
Cookie Preferences
This cookie is used to store the user's cookie consent preferences.
-
Cookie Preferences
This cookie is used to store the user's cookie consent preferences.
-
Cookie Preferences
This cookie is used to store the user's cookie consent preferences.
-
Cookie Preferences
This cookie is used to store the user's cookie consent preferences.
-
Cookie Preferences
This cookie is used to store the user's cookie consent preferences.
-
Cookie Preferences
This cookie is used to store the user's cookie consent preferences.
-
Cookie Preferences
This cookie is used to store the user's cookie consent preferences.
-
Cookie Preferences
This cookie is used to store the user's cookie consent preferences.
-
Cookie Preferences
This cookie is used to store the user's cookie consent preferences.
-
Cookie Preferences
This cookie is used to store the user's cookie consent preferences.
-
Cookie Preferences
This cookie is used to store the user's cookie consent preferences.
-
Cookie Preferences
This cookie is used to store the user's cookie consent preferences.
-
Cookie Preferences
This cookie is used to store the user's cookie consent preferences.
-
Cookie Preferences
This cookie is used to store the user's cookie consent preferences.
-
Cookie Preferences
This cookie is used to store the user's cookie consent preferences.
-
Cookie Preferences
This cookie is used to store the user's cookie consent preferences.
-
Cookie Preferences
This cookie is used to store the user's cookie consent preferences.
-
Cookie Preferences
This cookie is used to store the user's cookie consent preferences.
-
Cookie Preferences
This cookie is used to store the user's cookie consent preferences.
-
Cookie Preferences
This cookie is used to store the user's cookie consent preferences.
-
Cookie Preferences
This cookie is used to store the user's cookie consent preferences.
-
Cookie Preferences
This cookie is used to store the user's cookie consent preferences.
-
Cookie Preferences
This cookie is used to store the user's cookie consent preferences.
-
Cookie Preferences
This cookie is used to store the user's cookie consent preferences.
-
Cookie Preferences
This cookie is used to store the user's cookie consent preferences.
-
Cookie Preferences
This cookie is used to store the user's cookie consent preferences.
-
Cookie Preferences
This cookie is used to store the user's cookie consent preferences.
-
Cookie Preferences
This cookie is used to store the user's cookie consent preferences.
-
Cookie Preferences
This cookie is used to store the user's cookie consent preferences.
-
Cookie Preferences
This cookie is used to store the user's cookie consent preferences.
-
Cookie Preferences
This cookie is used to store the user's cookie consent preferences.
-
Cookie Preferences
This cookie is used to store the user's cookie consent preferences.
-
Cookie Preferences
This cookie is used to store the user's cookie consent preferences.
-
Cookie Preferences
This cookie is used to store the user's cookie consent preferences.
-
Cookie Preferences
This cookie is used to store the user's cookie consent preferences.
-
Cookie Preferences
This cookie is used to store the user's cookie consent preferences.
-
Cookie Preferences
This cookie is used to store the user's cookie consent preferences.
-
Cookie Preferences
This cookie is used to store the user's cookie consent preferences.
-
Cookie Preferences
This cookie is used to store the user's cookie consent preferences.
-
Cookie Preferences
This cookie is used to store the user's cookie consent preferences.
-
Cookie Preferences
This cookie is used to store the user's cookie consent preferences.
-
Cookie Preferences
This cookie is used to store the user's cookie consent preferences.
-
Cookie Preferences
This cookie is used to store the user's cookie consent preferences.
-
Cookie Preferences
This cookie is used to store the user's cookie consent preferences.
-
Cookie Preferences
This cookie is used to store the user's cookie consent preferences.
-
Cookie Preferences
This cookie is used to store the user's cookie consent preferences.
-
Cookie Preferences
This cookie is used to store the user's cookie consent preferences.
-
Cookie Preferences
This cookie is used to store the user's cookie consent preferences.
-
Cookie Preferences
This cookie is used to store the user's cookie consent preferences.
-
Cookie Preferences
This cookie is used to store the user's cookie consent preferences.
-
Cookie Preferences
This cookie is used to store the user's cookie consent preferences.
-
Cookie Preferences
This cookie is used to store the user's cookie consent preferences.
-
Cookie Preferences
This cookie is used to store the user's cookie consent preferences.
-
Cookie Preferences
This cookie is used to store the user's cookie consent preferences.
-
Cookie Preferences
This cookie is used to store the user's cookie consent preferences.
-
Cookie Preferences
This cookie is used to store the user's cookie consent preferences.
-
Cookie Preferences
This cookie is used to store the user's cookie consent preferences.
-
Cookie Preferences
This cookie is used to store the user's cookie consent preferences.
-
Cookie Preferences
This cookie is used to store the user's cookie consent preferences.
-
Cookie Preferences
This cookie is used to store the user's cookie consent preferences.
-
Cookie Preferences
This cookie is used to store the user's cookie consent preferences.
-
Cookie Preferences
This cookie is used to store the user's cookie consent preferences.
-
Cookie Preferences
This cookie is used to store the user's cookie consent preferences.
-
Cookie Preferences
This cookie is used to store the user's cookie consent preferences.
-
Cookie Preferences
This cookie is used to store the user's cookie consent preferences.
-
Cookie Preferences
This cookie is used to store the user's cookie consent preferences.
-
Cookie Preferences
This cookie is used to store the user's cookie consent preferences.
-
Cookie Preferences
This cookie is used to store the user's cookie consent preferences.
-
Cookie Preferences
This cookie is used to store the user's cookie consent preferences.
-
Cookie Preferences
This cookie is used to store the user's cookie consent preferences.
-
Cookie Preferences
This cookie is used to store the user's cookie consent preferences.
-
Cookie Preferences
This cookie is used to store the user's cookie consent preferences.
-
Cookie Preferences
This cookie is used to store the user's cookie consent preferences.
-
Cookie Preferences
This cookie is used to store the user's cookie consent preferences.
-
Cookie Preferences
This cookie is used to store the user's cookie consent preferences.
-
Cookie Preferences
This cookie is used to store the user's cookie consent preferences.
-
Cookie Preferences
This cookie is used to store the user's cookie consent preferences.
-
Cookie Preferences
This cookie is used to store the user's cookie consent preferences.
-
Cookie Preferences
This cookie is used to store the user's cookie consent preferences.
-
Cookie Preferences
This cookie is used to store the user's cookie consent preferences.
-
Cookie Preferences
This cookie is used to store the user's cookie consent preferences.
-
Cookie Preferences
This cookie is used to store the user's cookie consent preferences.
-
Cookie Preferences
This cookie is used to store the user's cookie consent preferences.
-
Cookie Preferences
This cookie is used to store the user's cookie consent preferences.
-
Cookie Preferences
This cookie is used to store the user's cookie consent preferences.
-
Cookie Preferences
This cookie is used to store the user's cookie consent preferences.
-
Cookie Preferences
This cookie is used to store the user's cookie consent preferences.
-
Cookie Preferences
This cookie is used to store the user's cookie consent preferences.
-
Cookie Preferences
This cookie is used to store the user's cookie consent preferences.
-
Cookie Preferences
This cookie is used to store the user's cookie consent preferences.
-
Cookie Preferences
This cookie is used to store the user's cookie consent preferences.
-
Cookie Preferences
This cookie is used to store the user's cookie consent preferences.
-
Cookie Preferences
This cookie is used to store the user's cookie consent preferences.
-
Cookie Preferences
This cookie is used to store the user's cookie consent preferences.
-
Cookie Preferences
This cookie is used to store the user's cookie consent preferences.
-
Cookie Preferences
This cookie is used to store the user's cookie consent preferences.
-
Cookie Preferences
This cookie is used to store the user's cookie consent preferences.
-
Cookie Preferences
This cookie is used to store the user's cookie consent preferences.
-
Cookie Preferences
This cookie is used to store the user's cookie consent preferences.
-
Cookie Preferences
This cookie is used to store the user's cookie consent preferences.
-
Cookie Preferences
This cookie is used to store the user's cookie consent preferences.
-
Cookie Preferences
This cookie is used to store the user's cookie consent preferences.
-
Cookie Preferences
This cookie is used to store the user's cookie consent preferences.
-
Cookie Preferences
This cookie is used to store the user's cookie consent preferences.
-
Cookie Preferences
This cookie is used to store the user's cookie consent preferences.
-
Cookie Preferences
This cookie is used to store the user's cookie consent preferences.
-
Cookie Preferences
This cookie is used to store the user's cookie consent preferences.
-
Cookie Preferences
This cookie is used to store the user's cookie consent preferences.
-
Cookie Preferences
This cookie is used to store the user's cookie consent preferences.
-
Cookie Preferences
This cookie is used to store the user's cookie consent preferences.
-
Cookie Preferences
This cookie is used to store the user's cookie consent preferences.
-
Cookie Preferences
This cookie is used to store the user's cookie consent preferences.
-
Cookie Preferences
This cookie is used to store the user's cookie consent preferences.
-
Cookie Preferences
This cookie is used to store the user's cookie consent preferences.
-
Cookie Preferences
This cookie is used to store the user's cookie consent preferences.
-
Cookie Preferences
This cookie is used to store the user's cookie consent preferences.
-
Cookie Preferences
This cookie is used to store the user's cookie consent preferences.
-
Cookie Preferences
This cookie is used to store the user's cookie consent preferences.
-
Cookie Preferences
This cookie is used to store the user's cookie consent preferences.
-
Cookie Preferences
This cookie is used to store the user's cookie consent preferences.
-
Cookie Preferences
This cookie is used to store the user's cookie consent preferences.
-
Cookie Preferences
This cookie is used to store the user's cookie consent preferences.
-
Cookie Preferences
This cookie is used to store the user's cookie consent preferences.
-
Cookie Preferences
This cookie is used to store the user's cookie consent preferences.
-
Cookie Preferences
This cookie is used to store the user's cookie consent preferences.
-
Cookie Preferences
This cookie is used to store the user's cookie consent preferences.
-
Cookie Preferences
This cookie is used to store the user's cookie consent preferences.
-
Cookie Preferences
This cookie is used to store the user's cookie consent preferences.
-
Cookie Preferences
This cookie is used to store the user's cookie consent preferences.
-
Cookie Preferences
This cookie is used to store the user's cookie consent preferences.
-
Cookie Preferences
This cookie is used to store the user's cookie consent preferences.
-
Cookie Preferences
This cookie is used to store the user's cookie consent preferences.
-
Cookie Preferences
This cookie is used to store the user's cookie consent preferences.
-
Cookie Preferences
This cookie is used to store the user's cookie consent preferences.
-
Cookie Preferences
This cookie is used to store the user's cookie consent preferences.
-
Cookie Preferences
This cookie is used to store the user's cookie consent preferences.
-
Cookie Preferences
This cookie is used to store the user's cookie consent preferences.
-
Cookie Preferences
This cookie is used to store the user's cookie consent preferences.
-
Cookie Preferences
This cookie is used to store the user's cookie consent preferences.
-
Cookie Preferences
This cookie is used to store the user's cookie consent preferences.
-
Cookie Preferences
This cookie is used to store the user's cookie consent preferences.
-
Cookie Preferences
This cookie is used to store the user's cookie consent preferences.
-
Cookie Preferences
This cookie is used to store the user's cookie consent preferences.
-
Cookie Preferences
This cookie is used to store the user's cookie consent preferences.
-
Cookie Preferences
This cookie is used to store the user's cookie consent preferences.
-
Cookie Preferences
This cookie is used to store the user's cookie consent preferences.
-
Cookie Preferences
This cookie is used to store the user's cookie consent preferences.
-
Cookie Preferences
This cookie is used to store the user's cookie consent preferences.
-
Cookie Preferences
This cookie is used to store the user's cookie consent preferences.
-
Cookie Preferences
This cookie is used to store the user's cookie consent preferences.
-
Cookie Preferences
This cookie is used to store the user's cookie consent preferences.
-
Cookie Preferences
This cookie is used to store the user's cookie consent preferences.
-
Cookie Preferences
This cookie is used to store the user's cookie consent preferences.
-
Cookie Preferences
This cookie is used to store the user's cookie consent preferences.
-
Cookie Preferences
This cookie is used to store the user's cookie consent preferences.
-
Cookie Preferences
This cookie is used to store the user's cookie consent preferences.
-
Cookie Preferences
This cookie is used to store the user's cookie consent preferences.
-
Cookie Preferences
This cookie is used to store the user's cookie consent preferences.
-
Cookie Preferences
This cookie is used to store the user's cookie consent preferences.
-
Cookie Preferences
This cookie is used to store the user's cookie consent preferences.
-
Cookie Preferences
This cookie is used to store the user's cookie consent preferences.
-
Cookie Preferences
This cookie is used to store the user's cookie consent preferences.
-
Cookie Preferences
This cookie is used to store the user's cookie consent preferences.
-
Cookie Preferences
This cookie is used to store the user's cookie consent preferences.
-
Cookie Preferences
This cookie is used to store the user's cookie consent preferences.
-
Cookie Preferences
This cookie is used to store the user's cookie consent preferences.
-
Cookie Preferences
This cookie is used to store the user's cookie consent preferences.
-
Cookie Preferences
This cookie is used to store the user's cookie consent preferences.
-
Cookie Preferences
This cookie is used to store the user's cookie consent preferences.
-
Cookie Preferences
This cookie is used to store the user's cookie consent preferences.
-
Cookie Preferences
This cookie is used to store the user's cookie consent preferences.
-
Cookie Preferences
This cookie is used to store the user's cookie consent preferences.
30 days
Cookie Preferences
This cookie is used to store the user's cookie consent preferences.
30 days
Cookie Preferences
This cookie is used to store the user's cookie consent preferences.
30 days
Cookie Preferences
This cookie is used to store the user's cookie consent preferences.
30 days
Cookie Preferences
This cookie is used to store the user's cookie consent preferences.
30 days
Cookie Preferences
This cookie is used to store the user's cookie consent preferences.
30 days
Cookie Preferences
This cookie is used to store the user's cookie consent preferences.
30 days
Cookie Preferences
This cookie is used to store the user's cookie consent preferences.
30 days
Cookie Preferences
This cookie is used to store the user's cookie consent preferences.
30 days
Cookie Preferences
This cookie is used to store the user's cookie consent preferences.
30 days
Cookie Preferences
This cookie is used to store the user's cookie consent preferences.
30 days
Cookie Preferences
This cookie is used to store the user's cookie consent preferences.
30 days
Cookie Preferences
This cookie is used to store the user's cookie consent preferences.
30 days
Cookie Preferences
This cookie is used to store the user's cookie consent preferences.
30 days
Cookie Preferences
This cookie is used to store the user's cookie consent preferences.
30 days
Cookie Preferences
This cookie is used to store the user's cookie consent preferences.
30 days


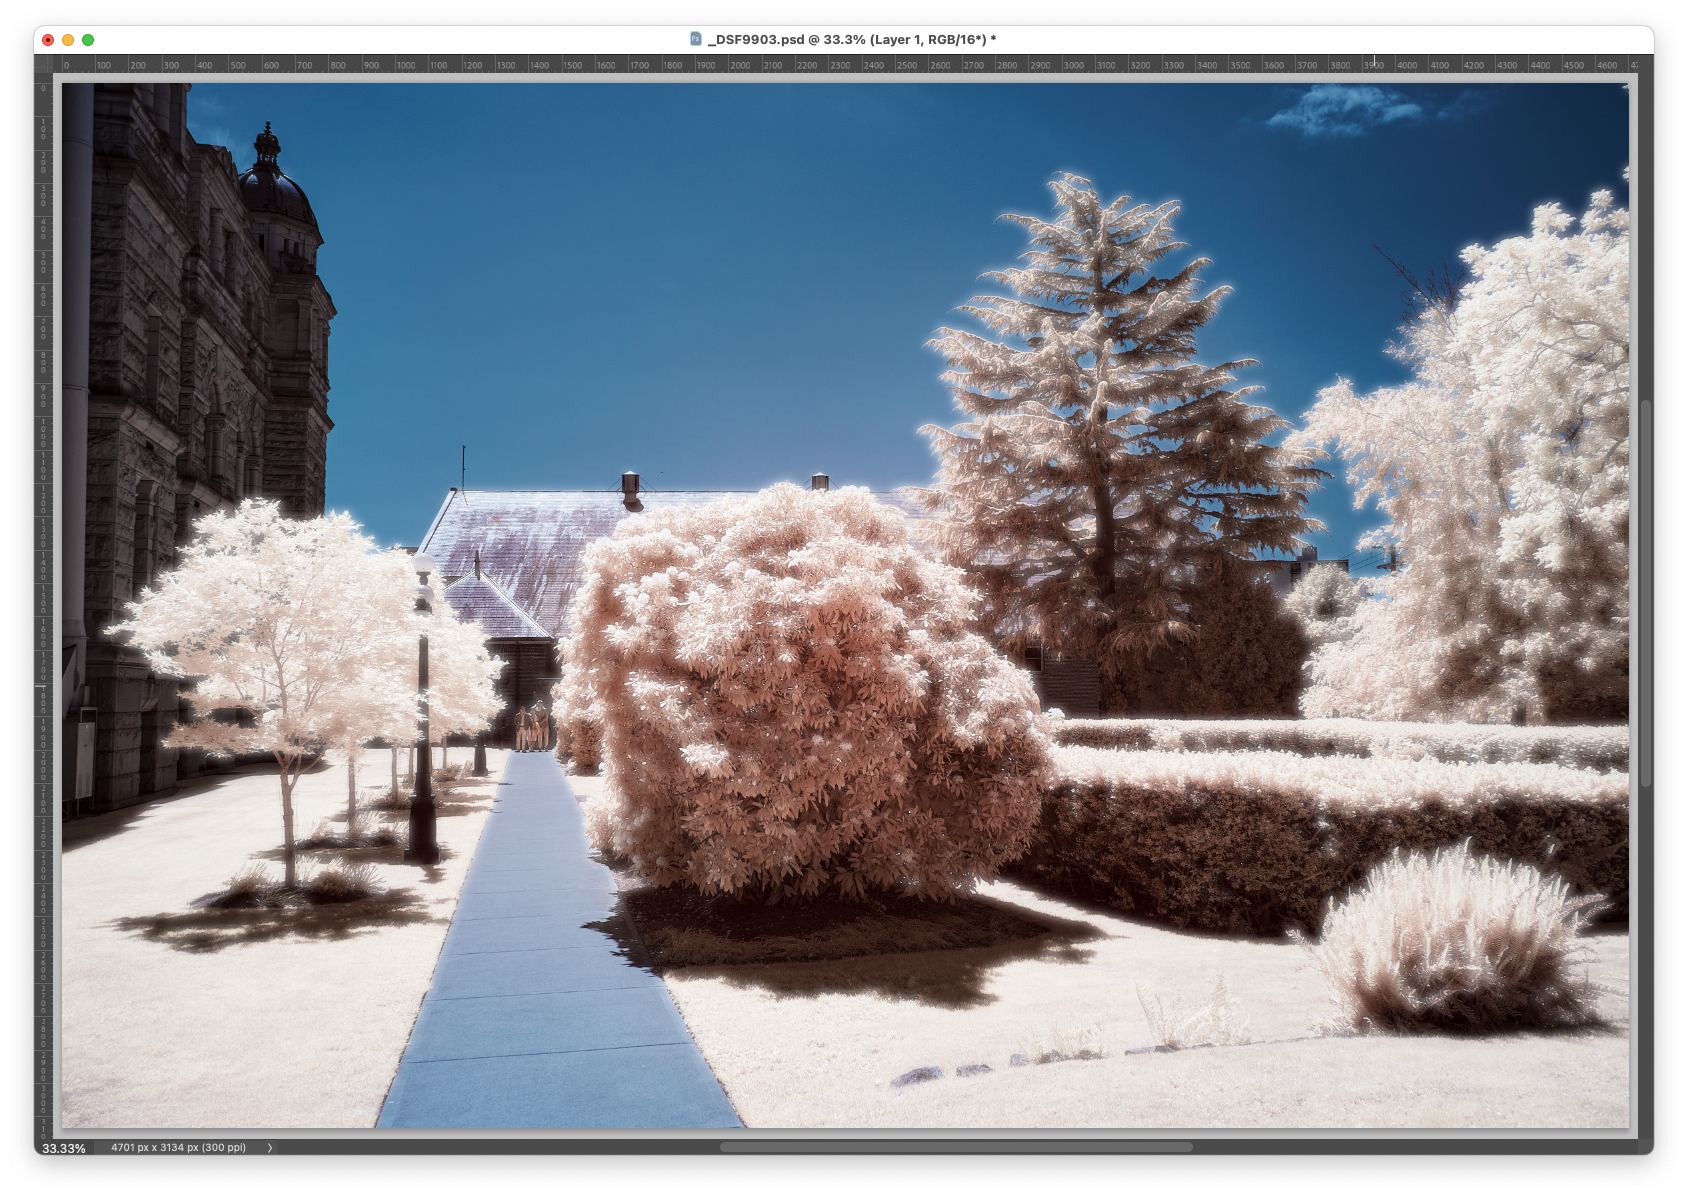
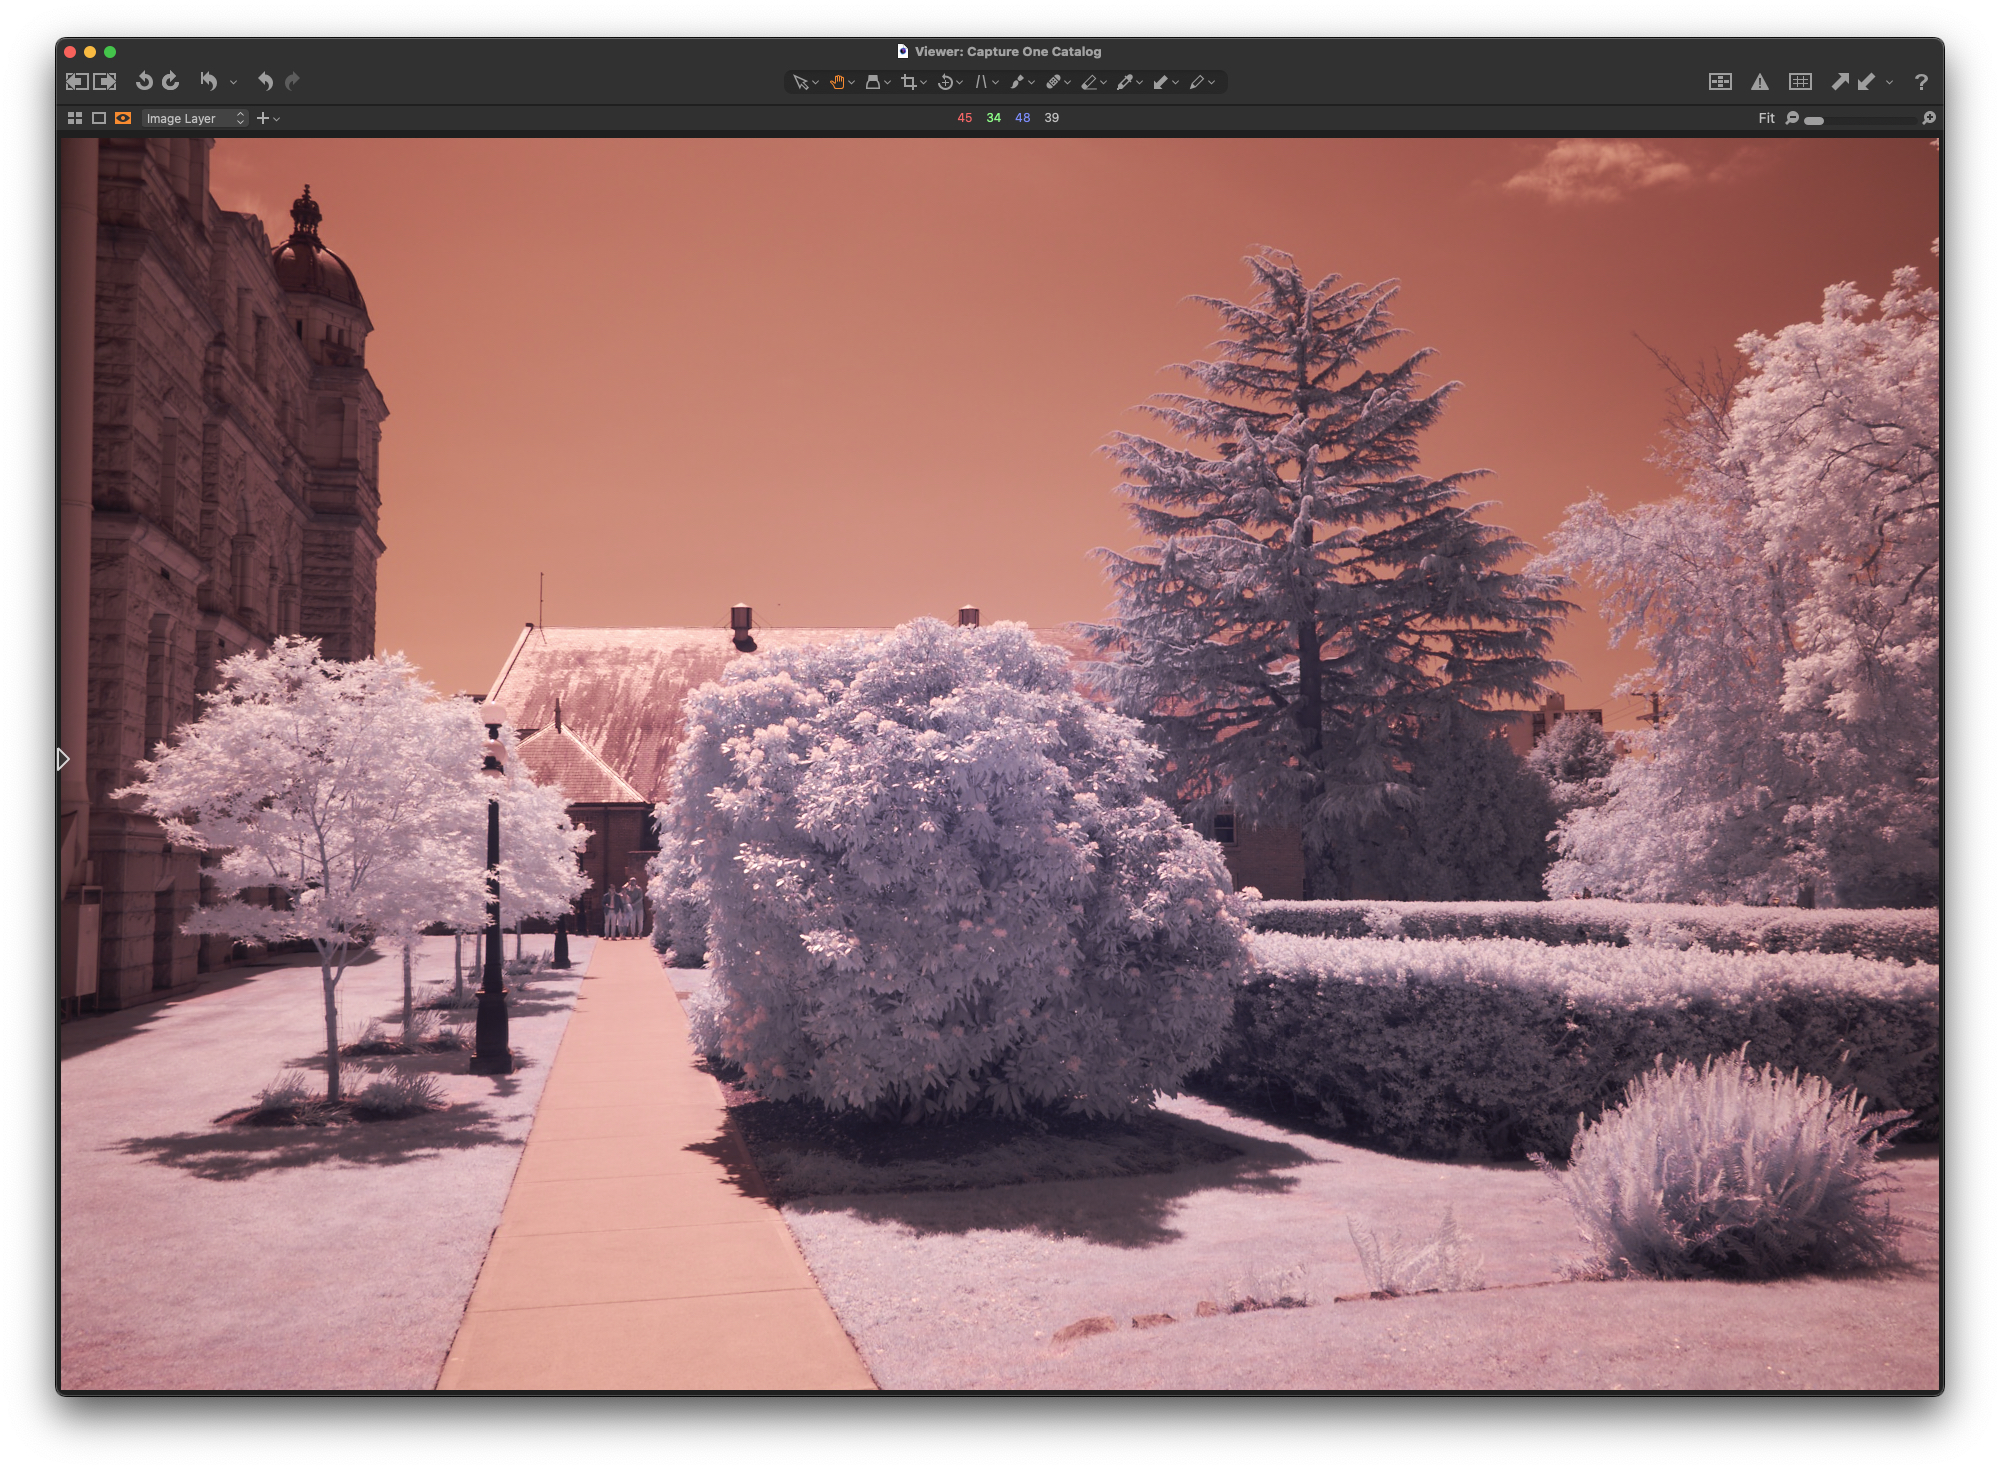 After the dramatic WB adjustment, we get the following, and that’s what I send from Capture One to Photoshop as a 16-bit PSD file…
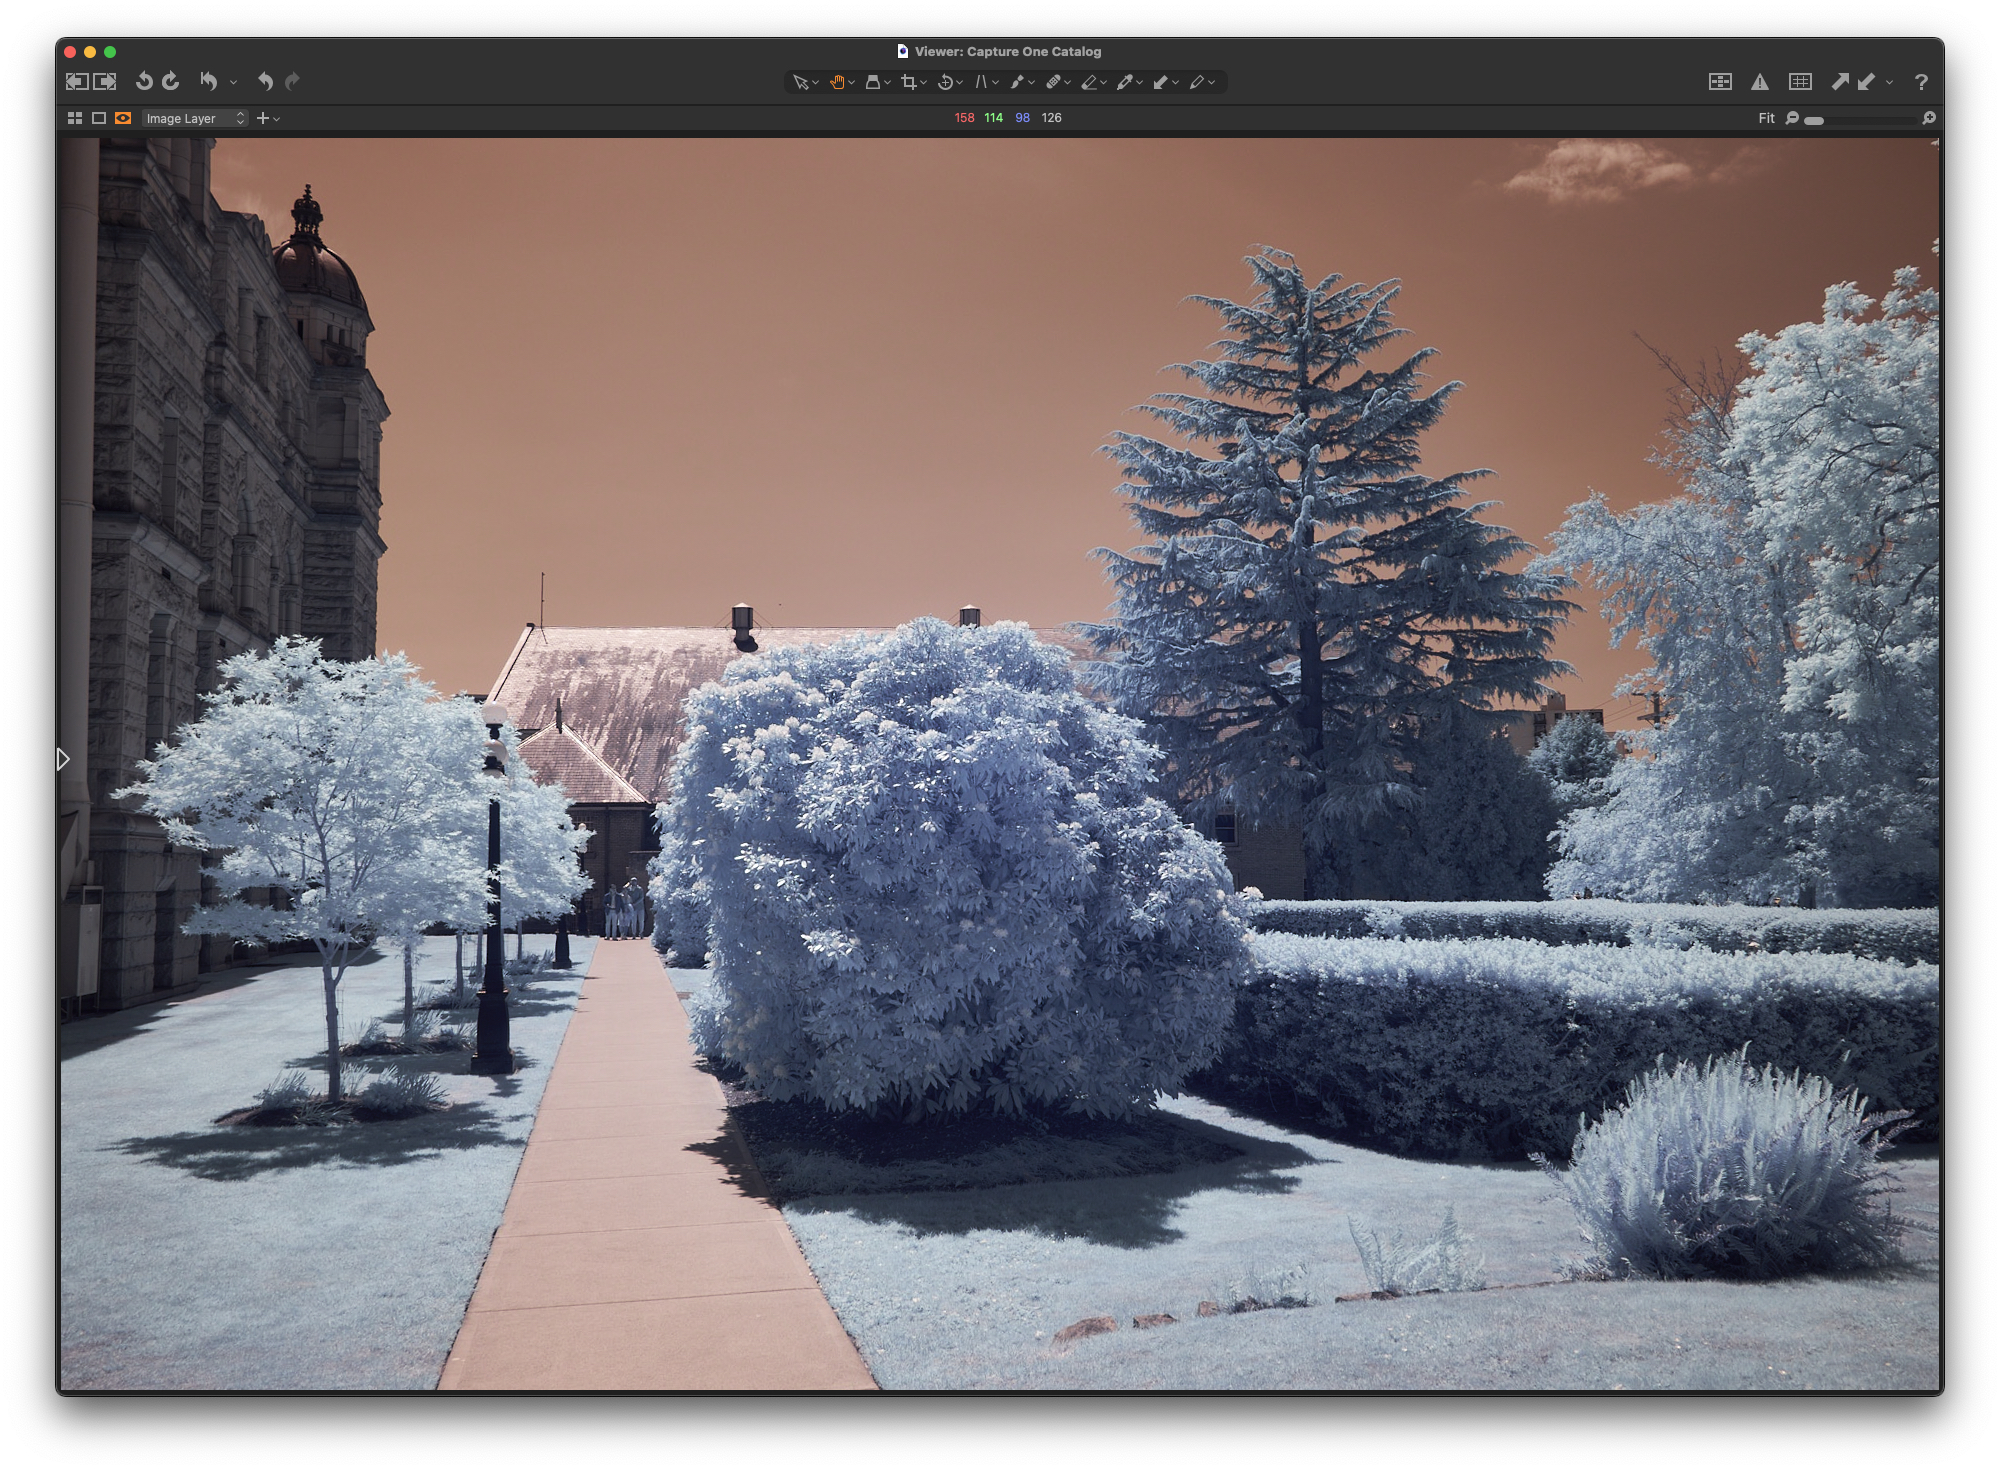
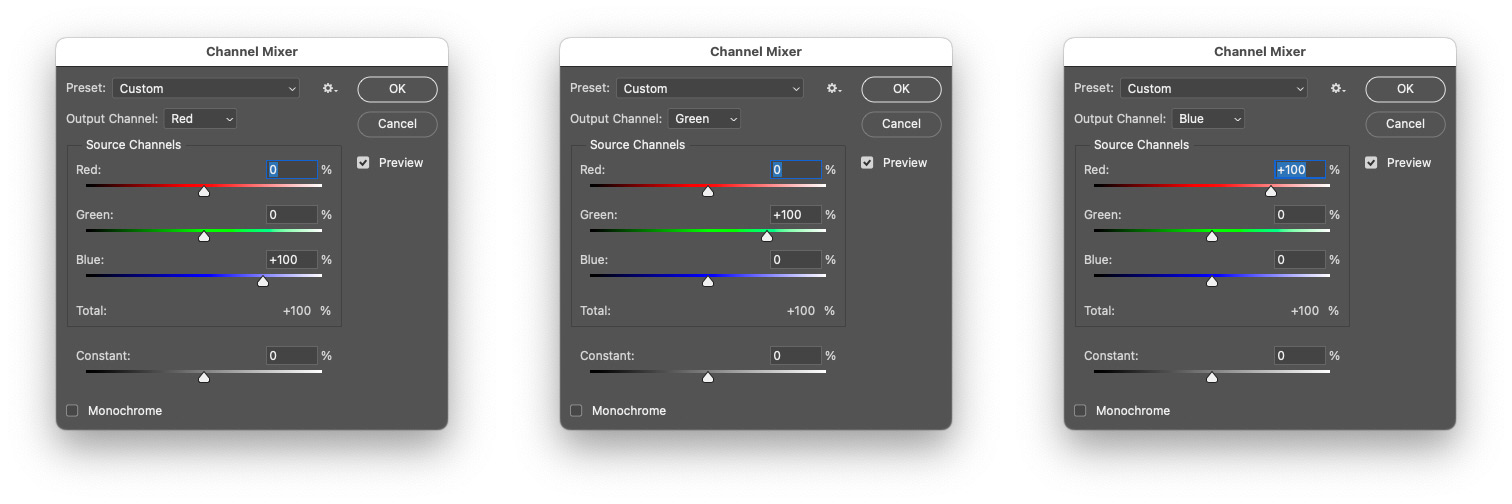 In Photoshop’s Channel Mixer, the red channel gets 0% red and green and 100% blue, green stays the same, and blue gets 0% blue and green and 100% red. Those settings effectively swap the red and blue channels of the image, resulting in this where the red skies are now blue…
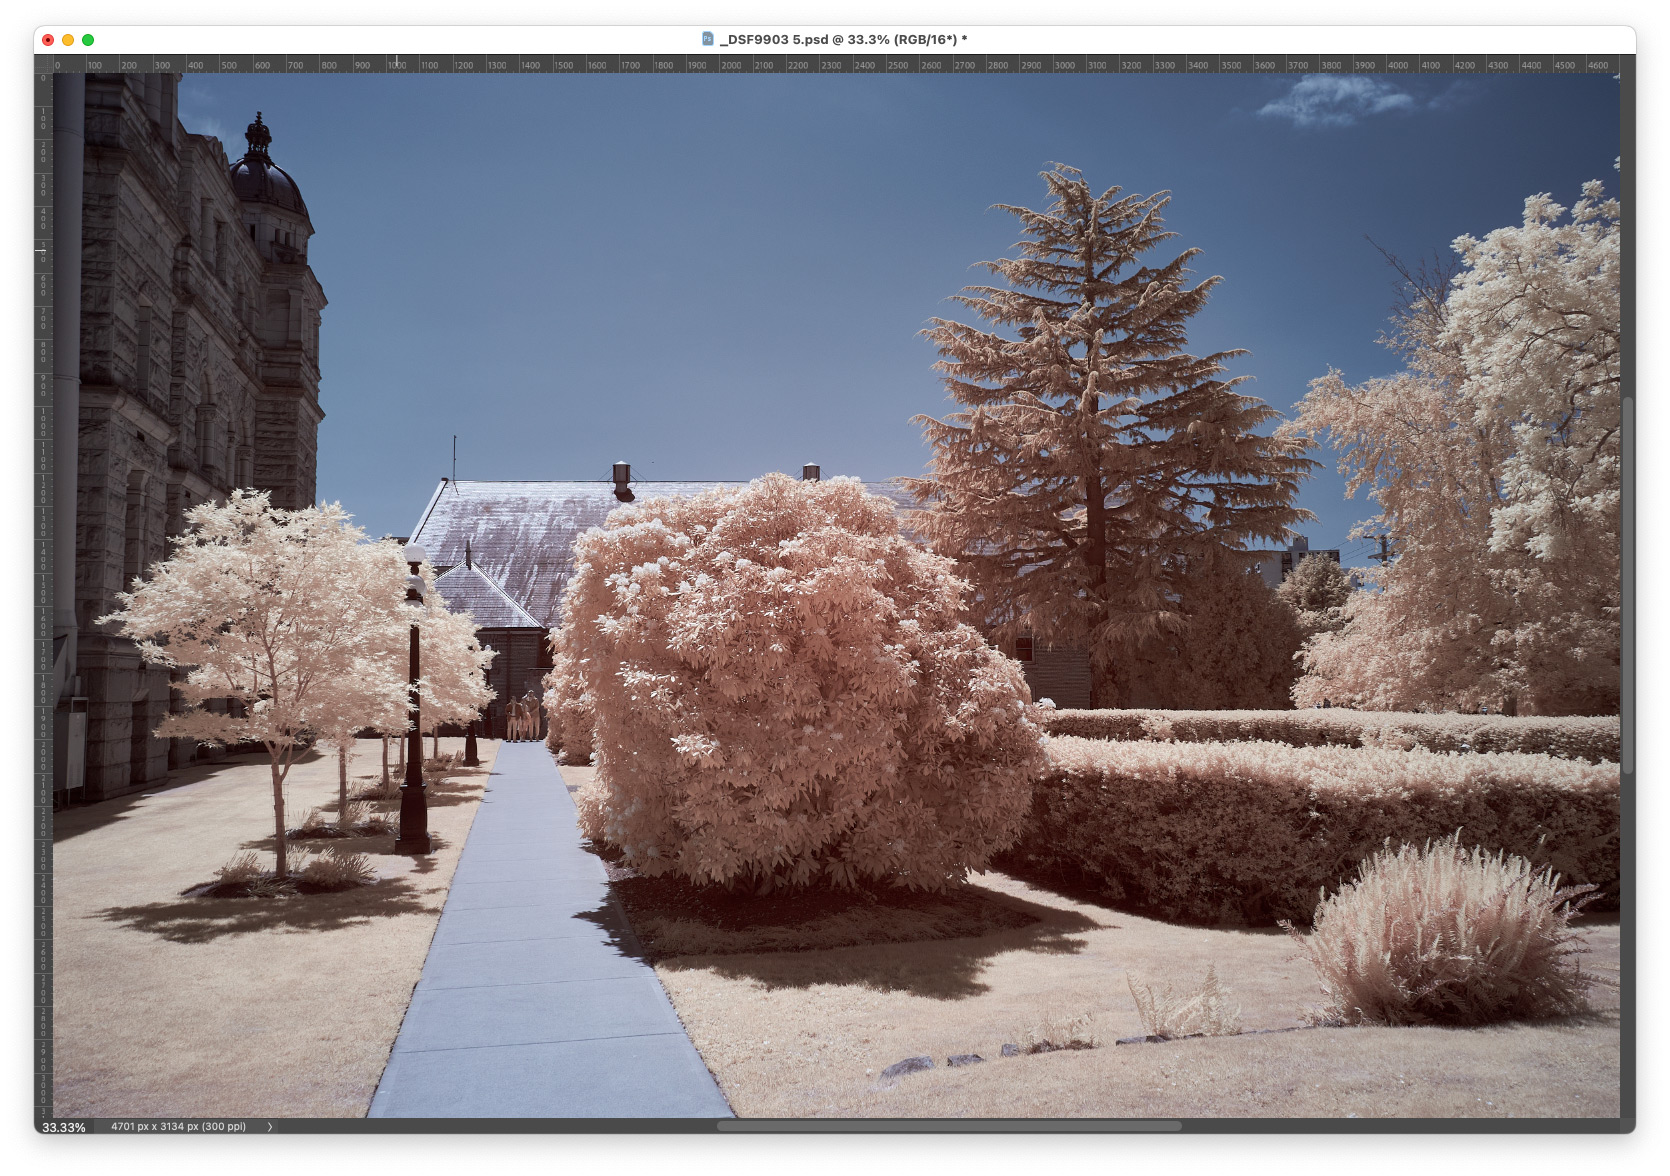 Then, I add contrast, clarity and saturation, as well as skew the colours slightly, for example skewing the blues away from magenta a little, resulting in this…
 Before getting into how I added the glow, I want to backtrack a little and detail how I got to the B&W version of the image. Starting with the image opened in Photoshop, before doing a channel swap, I apply the following Black and White conversion settings…
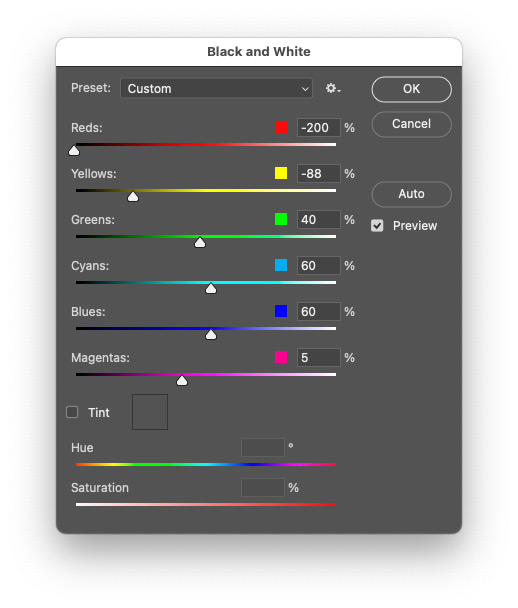 Those settings make the reds and oranges of the original image a lot darker, adding to the dramatic B&W contrast that I like. I also add some more overall contrast using curves, and that results in this…
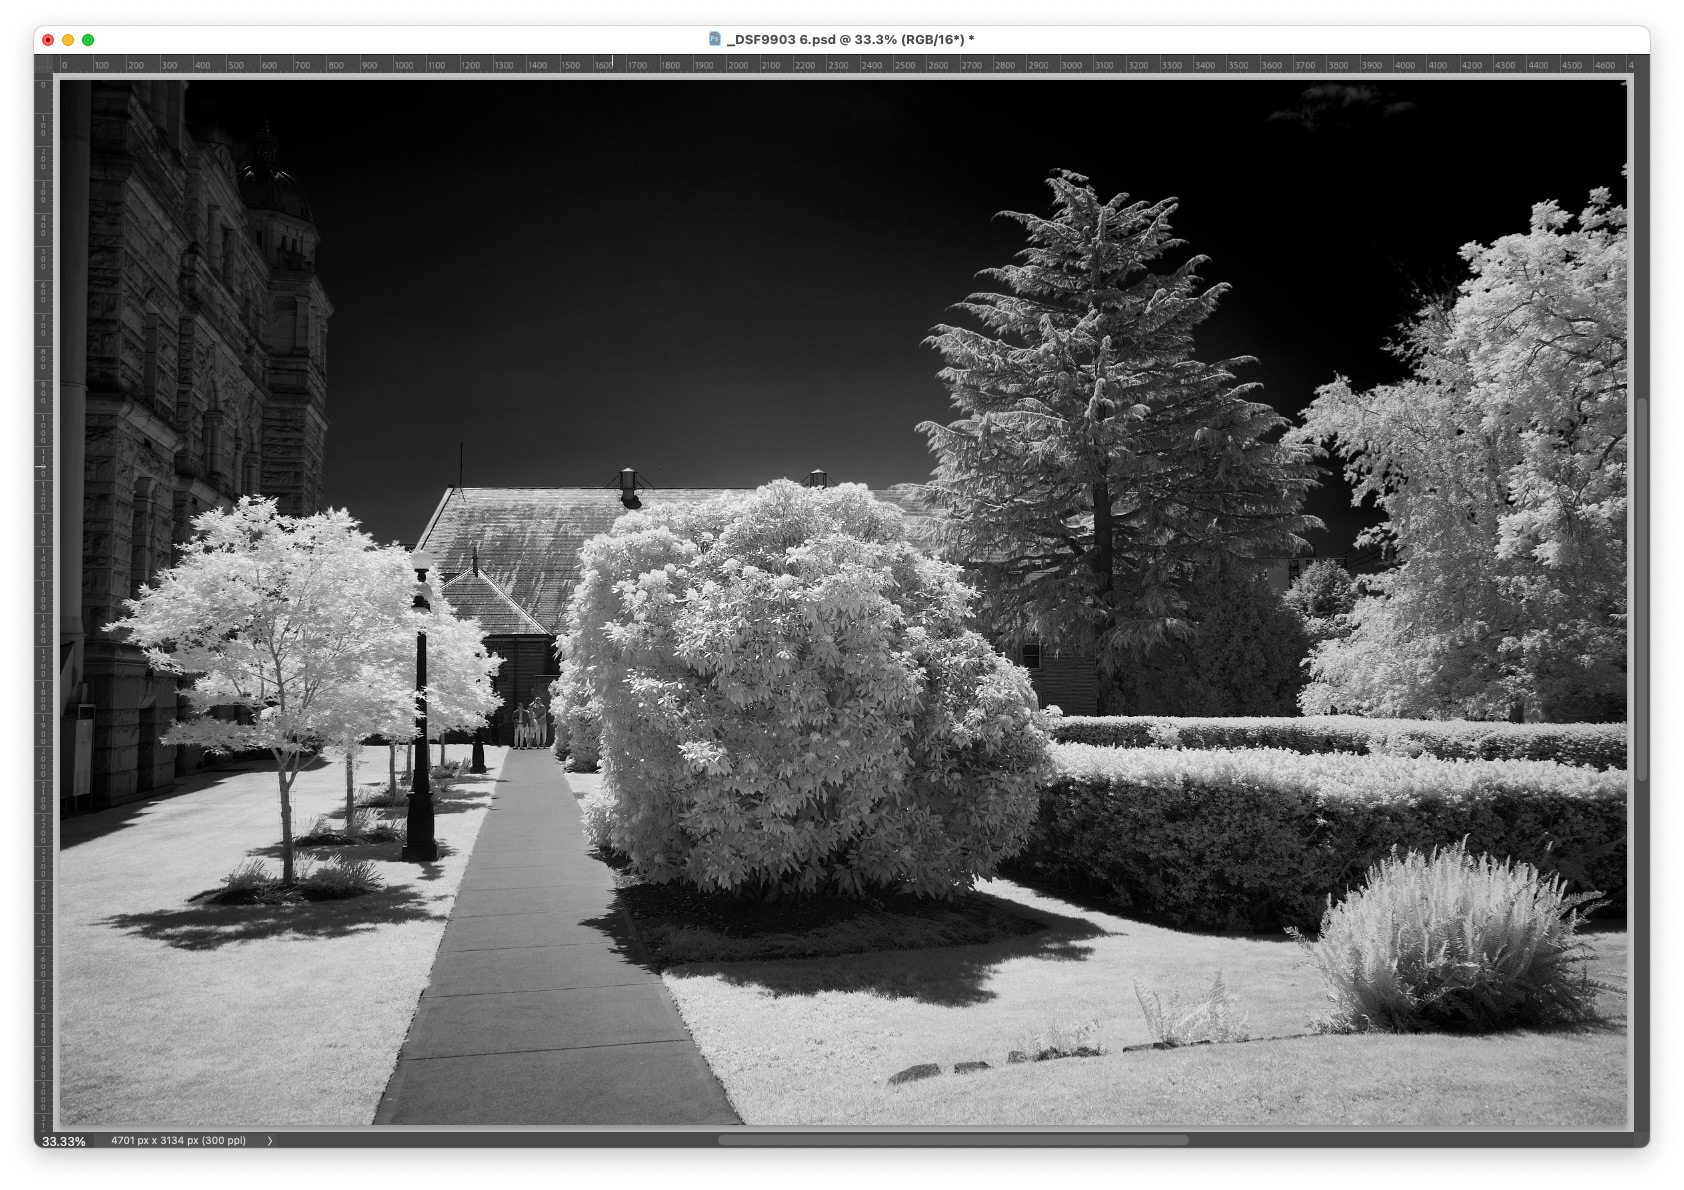 With the added glow, I then finally get this…
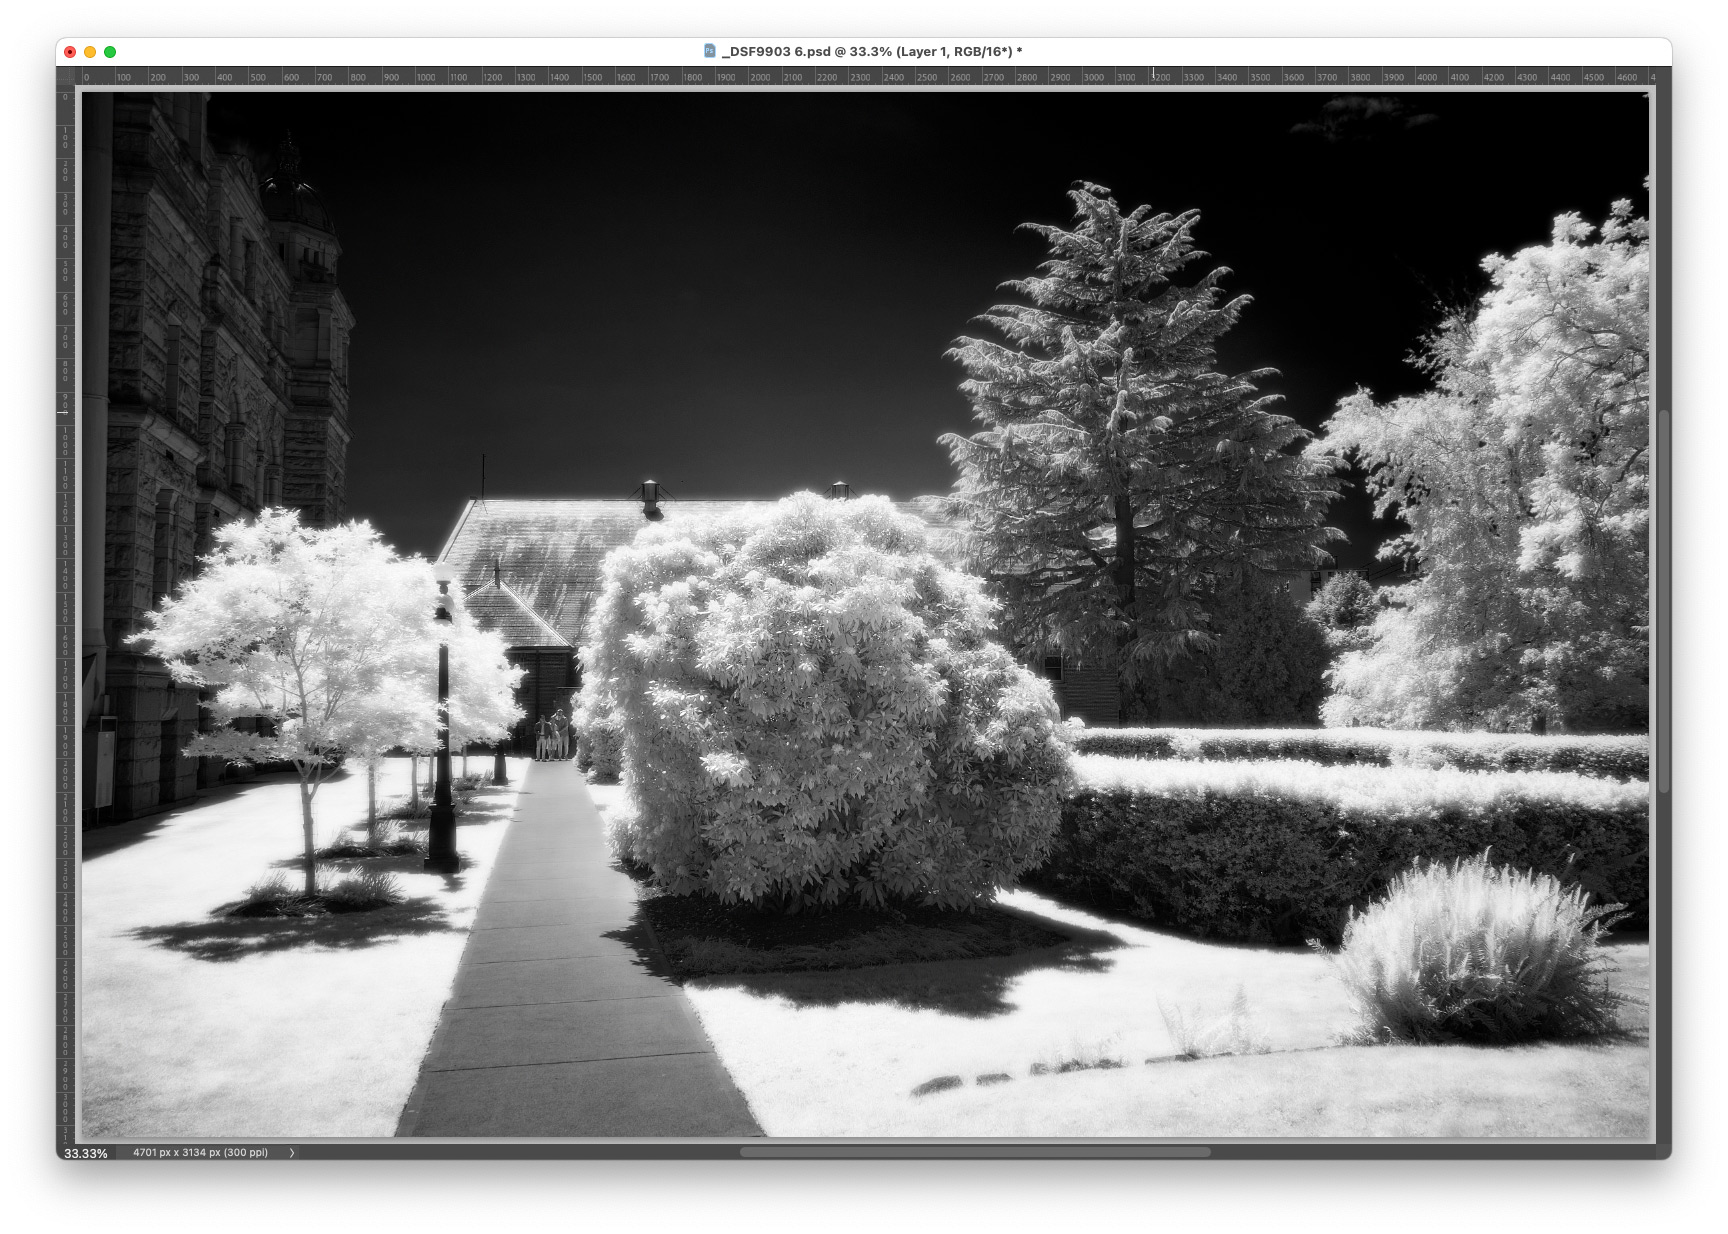 So, how do I add the glow? It is an action which does the following things…
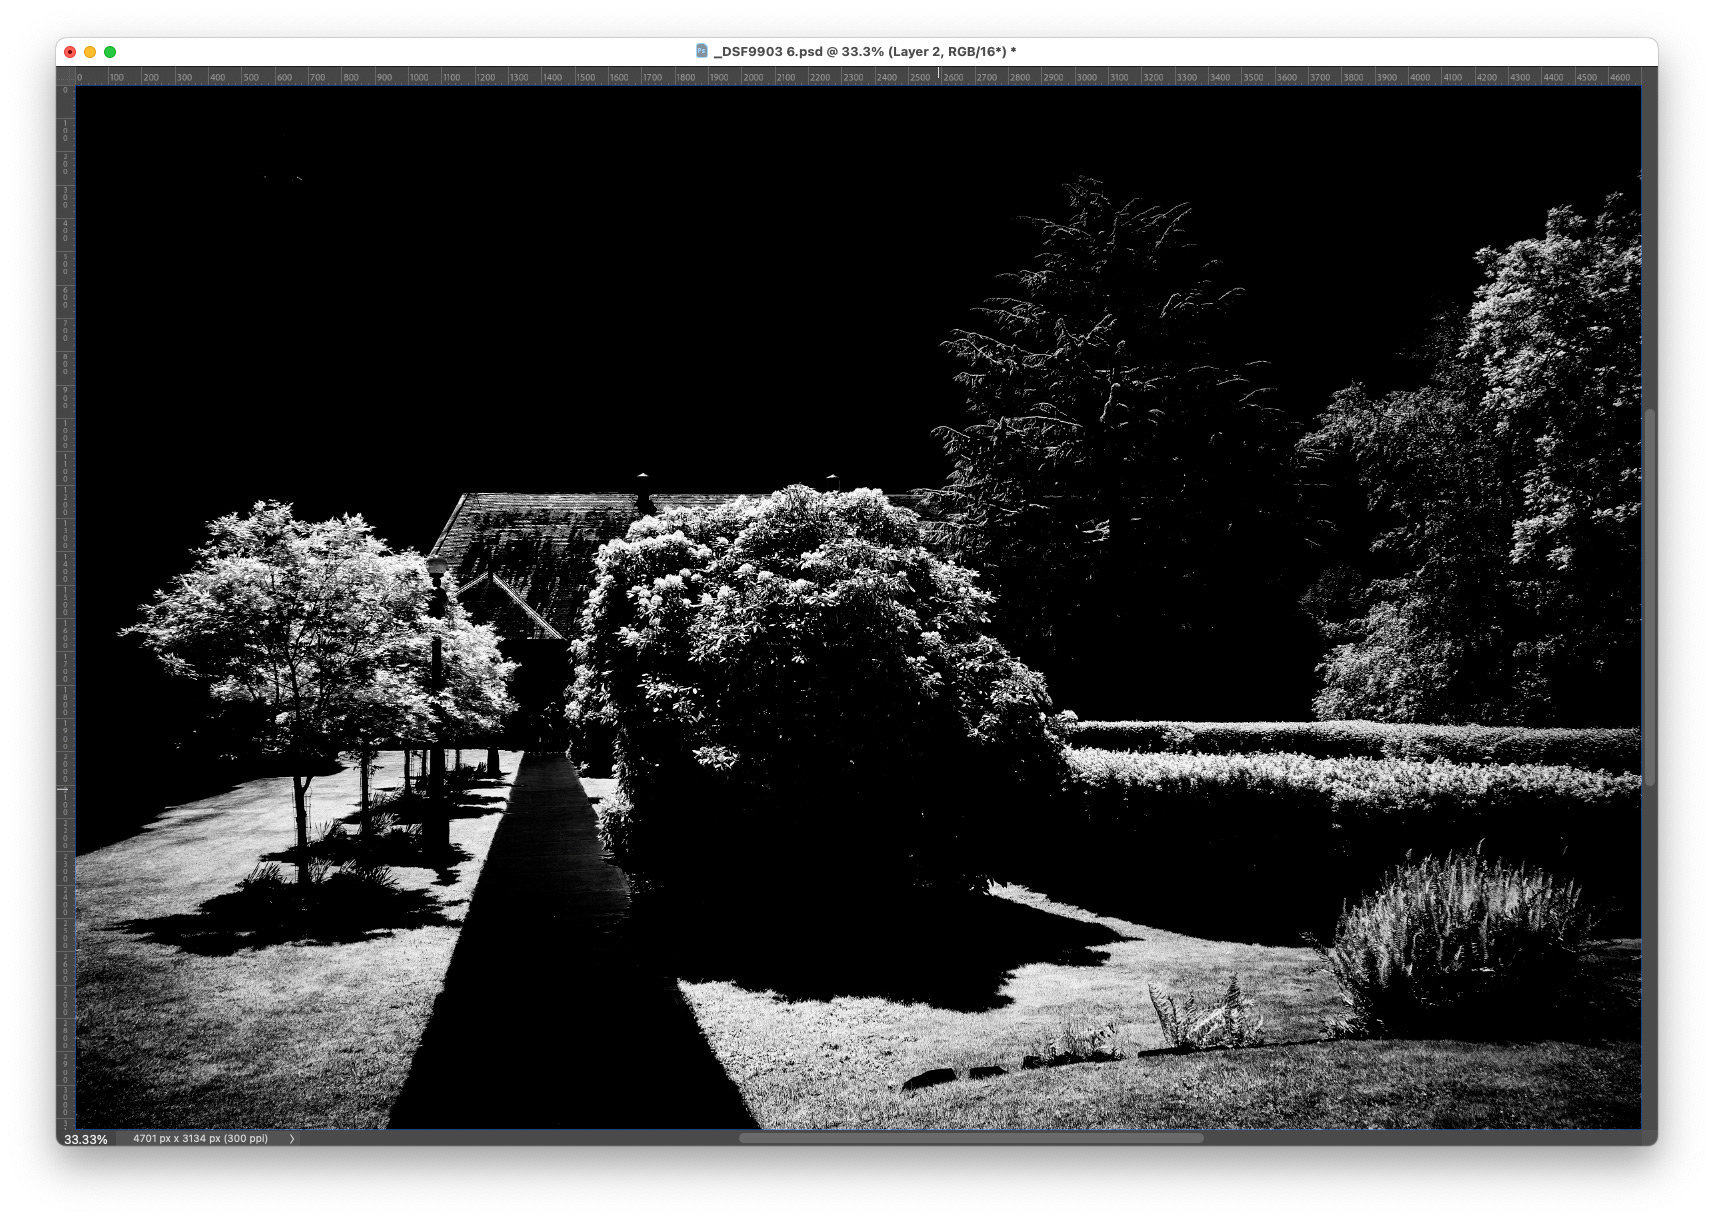 Lastly, after the Gaussian Blur, and layer duplication, this is what one is left with (again, with just a black layer inserted below)…
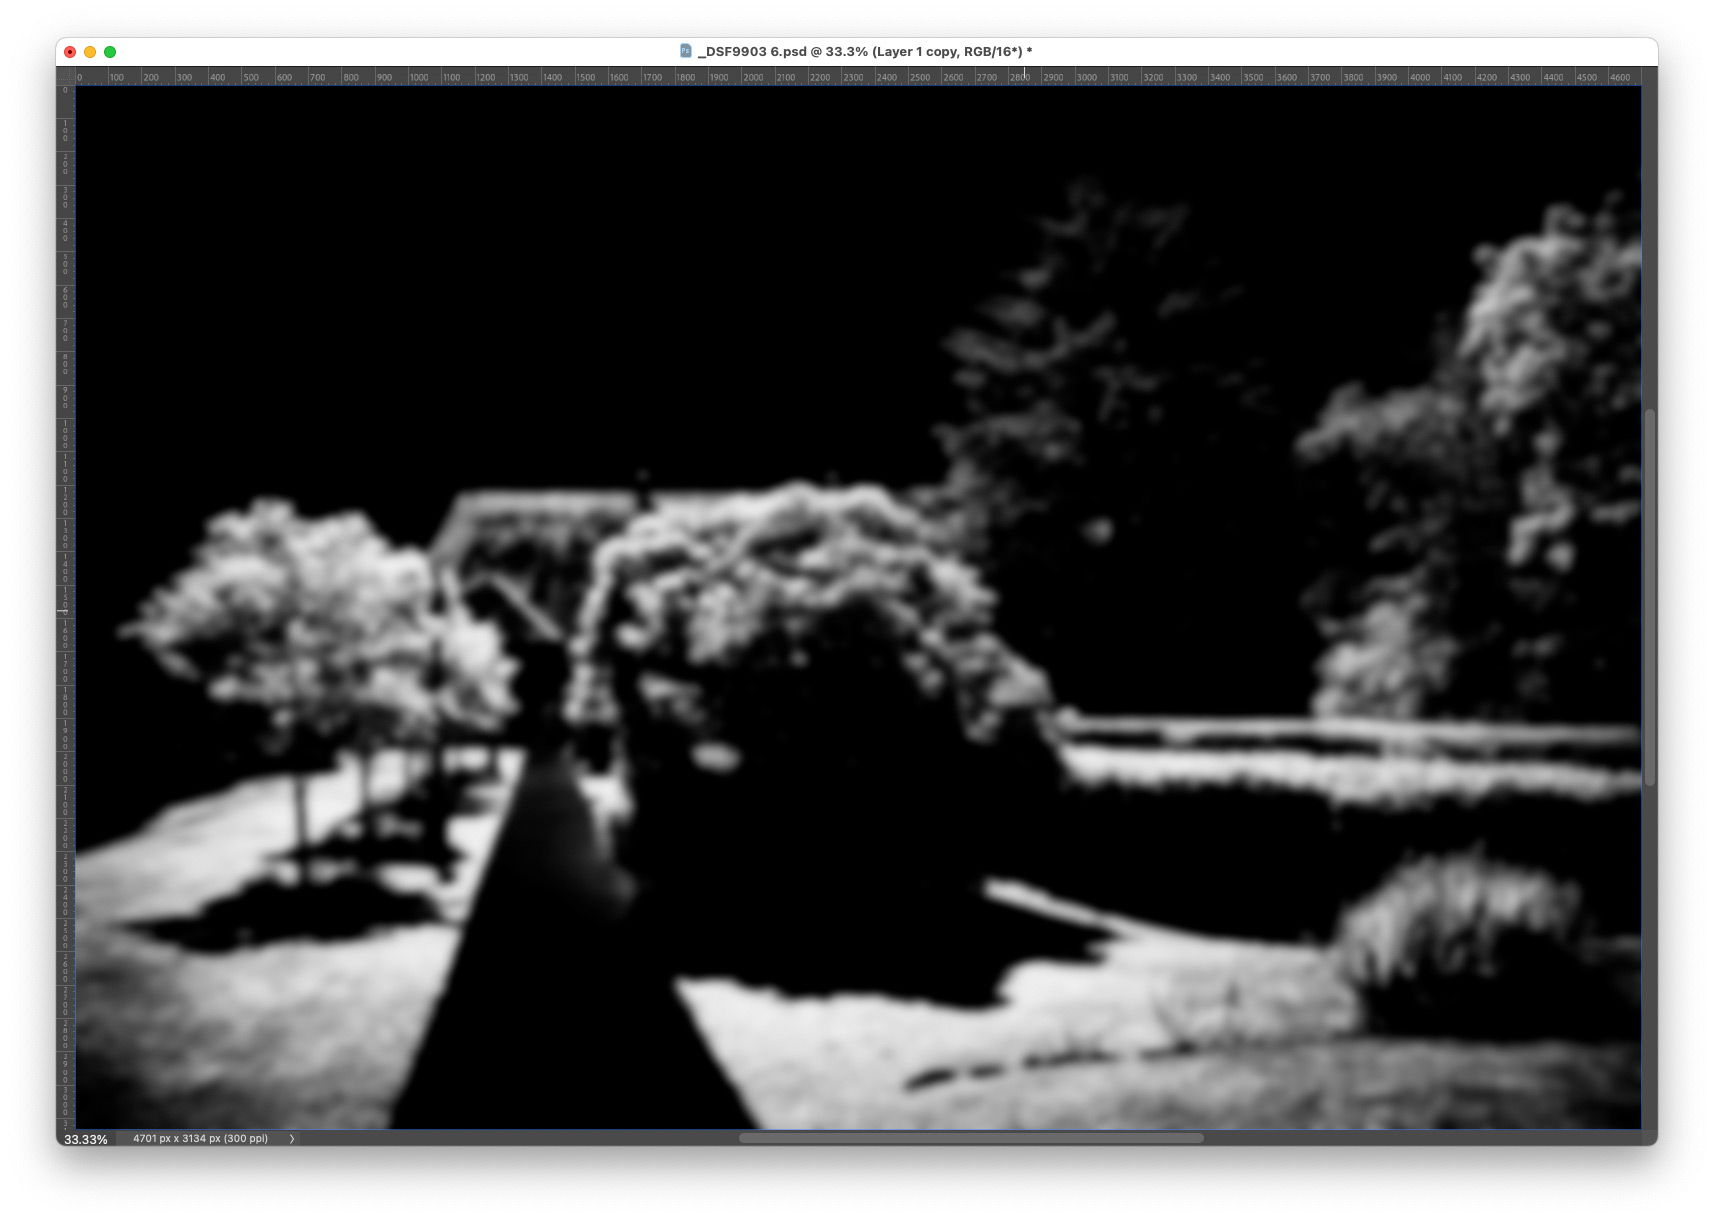 One can get more sophisticated, which I have done myself as well, by selecting the bright areas and doing a smaller radius Gaussian Blur, then selecting only the very brightest highlights and using a larger blur radius to make those haloes a little larger around the brightest areas. Then, I’ve even reduced the opacity of the “interior” parts of the glow to maintain a little more detail and mostly restrict the glow to edges of bright objects. For the sake of brevity here though, I’ve kept it simpler since one can still get a nice result even with this fairly simple technique.